


There are multiple approaches and strategies to organizing Shopping campaigns for PPC. All of these will vary greatly depending on the brand, the number of products, the price of products, the type of products, feed organization, and the list keeps going. However, I have narrowed account-wide Shopping structures down to two options. Again, these aren’t the only two options, but in my opinion, they promote a universal adaptability while still offering flexibility (depending on the account’s needs).
In this post, I will be discussing only one of these options for two reasons.
- It’s way too much information to squeeze into one post.
- I want to provide as much detail as I can in the case you are able to bring this Shopping structure back to your own accounts.
However, if the first option doesn’t fit your paid strategy and/or you’re interested in learning more about the second option, I promise to deliver Part 2 next month, so keep an eye out!
Anyway, the first part of my Shopping structure series, if you will, is centered around organizing through priority tiers. In this case, we will have three tiers that align with the three campaign priority settings for Shopping: High, Medium, and Low.
(Disclaimer: This is not a post about organization within a Shopping campaign. Rather, it is about how you should organize your campaigns to work together within an account.)
Settings
Before getting started, it is important to have a good understanding of the backend in Shopping campaigns. Even if you feel confident in your knowledge of Shopping and how your campaigns are set up, at least glance over The Complete Google AdWords Shopping Campaign Settings Breakdown. I will cover some aspects in this post, but that specific post provides a more thorough explanation.
Defining The Tiers
The primary concept of this organization strategy is breaking everything out into tiers based on campaign priority. Again, those priorities are High, Medium, and Low. We will use these to group our campaigns by Top Performers, Product Groups, and All Products.
Top Performers
You can define Top Performers in a variety of ways. However, I typically do so at a product level based on those products that lead in conversions. More often than not, your top-converting products will also be responsible for a higher amount of impressions and spend. If you have a smaller inventory of products, you can have these in one campaign. To do this, simply add them in by their Item ID number when creating the ad group. Then, name your campaign something along the lines of “Google_Shopping_Top Performers”.
However, if you have a larger inventory, you can have multiple Top Performer campaigns. Just be sure to group them with like themes for organizational purposes at the campaign level, with a similar Item ID setup at the ad group level. For example, you could group top performers by product types with naming conventions similar to this.
- Google_Shopping_Top Performers_Boots
- Google_Shopping_Top Performers_Sandals
- Google_Shopping_Top Performers_Sneakers
- Google_Shopping_Top Performers_Dress Shoes
Or, you could group them by Brand, if that makes more sense with your inventory. For example:
- Google_Shopping_Top Performers_Ariat
- Google_Shopping_Top Performers_Birkenstock
- Google_Shopping_Top Performers_Nike
- Google_Shopping_Top Performers_Tommy Hilfiger
In either case, you should give these a high campaign priority, their own budget, and aggressive bidding.
Product Categories
Product categories are your middle-tier campaigns. In most cases, this tier will have the most campaigns and each must always have a medium campaign priority. In theory, since you’ve now segmented out the Top Performers, these campaigns will allow those middle tier products to receive more traffic. Remember that your Top Performers steal most of the impressions and budget, so this structure allows you to better allocate budgets and ensure a wider variety of your inventory is receiving traffic.
Again, depending on the account, feed, and inventory, these categories will vary. However, I like to have a Product Category campaign present for all categories in my inventory. For example, if I sold sports equipment, my campaigns could look similar to this.
- Google_Shopping_Product Categories_Basketball
- Google_Shopping_Product Categories_Baseball
- Google_Shopping_Product Categories_Football
- Google_Shopping_Product Categories_Soccer
The most important piece to the Product Category breakouts is excluding those Top Performer IDs from their respective Product Category campaigns. For example, if a certain Nike Basketball is a Top Performer, that ID should not be in the Product Categories_Basketball campaign. However, it isn’t the end of the world if you forget this step (often times you may intentionally ignore this step, in fact). If you were to keep the item ID in both, that certain Nike Basketball would not show in the Product Categories campaign until the Top Performer campaign ran out of budget. Again, Google will show an ad for that basketball in the campaign with the highest priority (even if the bid is lower). But, if that high priority campaign is out of budget, it will default to the next lowest available. So, it really comes down to advertiser preference. However, I like to exclude them in the Product Category campaigns for two reasons.
- It allows me to better control the budgets on the Top Performers (whether that be increasing or decreasing).
- It prevents those Top Performers from stealing traffic from the middle tier of the inventory (the whole point of this structure).
All Products
All Products make up the final tier in this type of account structure for Shopping. Typically, you will only need one campaign for this. It will be set on a low campaign priority with a much lower bid than your Top Products and Product Categories. It really serves two primary purposes in this type of structure.
- A catch-all for those items that you haven’t specifically targeted yet or those items other campaigns are not targeting.
- A safety net to show top-converting products when higher-tiered campaigns run out of budget. In this case, you wouldn’t have to worry about Item ID exclusions since the priority and bids are so low.
In other words, one of the purposes of this campaign is to show for those Top Products on a secondary level, whereas the Product Category campaigns are supposed to show for other products.
For this type of campaign, you can simply target “Everything else in All Products” at one low bid. There is no need to break down by Item IDs or Product Types. Also, this is the only campaign where you should ever be targeting “Everything else in All Products”. It should be excluded in all other campaigns.
There are two final notes for the All Products campaign.
- You should have an All Products campaign in just about any PPC account with Shopping Ads. It doesn’t matter what your structure is, they are a great catch-all to have in place.
- I have had some success with breaking the All Products campaign out by device. In other words, I had three bottom-tier campaigns, each specific to desktop, tablet, and mobile. This can be a good option if you’re noticing poor performance in your All Products campaign.
Putting It All Together
Since we have determined what each tier consists of, here is a visual to help put everything into perspective.
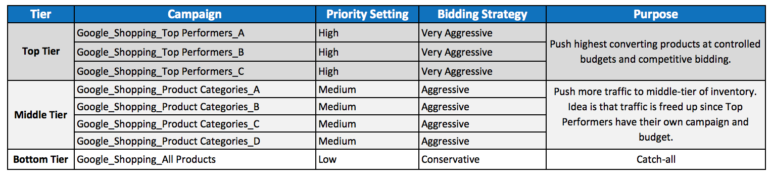
In summary, this structure allows you to pull out Top Performers and put them into their own campaign. This helps you be more competitive with bidding since the return is there. Plus, it helps you keep a more accurate pulse of those products. Then, by pulling out those Top Performers, you can now drive more traffic to the middle tier of your inventory with the Product Categories campaigns. Since the Top Performers aren’t completely stealing all of the traffic and budget, other products now have the chance to get a higher quantity of traffic. Finally, the All Products campaign will act as a catch-all. Again, it should have a low priority and a much lower bid than the other campaigns. It will cover both untargeted products and act as a secondary option for when other campaigns run out of budget.
Cyclical Maintenance
Aside from the normal bid changes, search query reports, audience layering, bid adjustments, etc., this type of structure also allows you to have an ongoing cyclical maintenance. In other words, you should be moving item IDs and product groups around based on performance. Here is a visual of this ongoing optimization strategy.

Lower Than ROAS Goal
This type of structure won’t always be perfect. So, when you see certain Top Performers fall below your desired return goal (to the point that slightly lowering the bid won’t fix it), you need to move it back to its respective Product Category campaign. This allows more budget to go to other Top Performers and allows the product you bumped to the middle tier to still show at a lower bid.
Then, if that same item ID/product continues to be below ROAS goal (or even the product group for that matter), you must then exclude it from the middle tier as well. At this point, you are still showing for those products, but at a much lower bid. This allows you to still show for that part of your inventory while making better use of the Shopping budget in other areas where there is a higher return.
Above ROAS Goal
On the other end of the spectrum, you can also you use this cyclical optimization pattern on high performing products or categories. For example, if you pull a report that shows 75% of the conversions in your All Products campaign are coming from one product or a group of products, make sure you are showing them in higher-tiered campaigns. If you are already showing them, maybe it’s time to adjust budgets, bids, and targeting. If you aren’t, then you will obviously want to add them in. You can follow this same strategy when analyzing both All Products and Product Category data. Just remember to exclude products as necessary, as previously discussed.
Conclusion
Again, this isn’t the only way to organize the Shopping campaigns in your account or even one of only two ways. However, it is a great strategy for allocating budgets, competitive bidding, mitigating cross-pollination, and continually optimizing your PLAs. In my post next month, I will discuss another Shopping structure I like to use that focuses on segmenting between branded and non-branded PLA targeting. So, if your account battles other vendors bidding (and using) your own brand in their PLAs, be sure to check it out!
