Anyone who has ever been put under pressure to build out a large account in a short space of time will know the trademark feeling of despair that can come with such a task. Luckily for us, there are a number of tools at our disposal that can speed up this process. When trying to build out thousands of ad groups, ads and keywords, templates can really improve your overall campaign creation speed. Today we’re going to take a quick look at how to build good PPC templates in Excel and how they can help you! Before we get started I recommend you check out our top 5 Excel tips for PPC managers.
For those of you new to templating, there are a number of reasons why you might want to use them:
- Save valuable time
- Provide consistency across ad groups and campaigns
- Can be used with many different kinds of accounts
- Generate many different keywords in a short amount of time
- Experience improved quality score by having ads that use keywords in the copy for all ad groups
Before you get started you will want to think about what can and can’t be done with templates. Generally I avoid templates when campaigns have very specific keywords that can’t be used in more than one ad group. Also, you should be aware that your ads will also most likely need some manual attention to avoid them going over character limits. Be aware that Excel PPC templates often require a fairly significant up front time investment, so might not be suited to one-off campaigns.
Now we’re clear about the whys, let’s move on to the how-tos! For the sake of the following example I’m going to invent the fictional eCommerce client, HeroShop. HeroShop is a huge electronic appliance retailer that has asked us to build out ten new campaigns – starting with TVs, but moving on to fridges, freezers, microwaves and the like.
Keywords:
The first step you’ll want to take is to do some thorough keyword research. In this case I’m going to look at the Google Keyword Tool to discover a number of buying phrases that customers regularly use when shopping for products. After some time I come up with a list of these terms: Buy, Sale, Discount, Offer, Cheap, Cheapest, Best, and Top. Once I’ve done this I go back to HeroShop’s website and list all the different variations of TVs on offer. In this case HeroShop is selling three sizes of TV – 46″, 55″ and 70″.
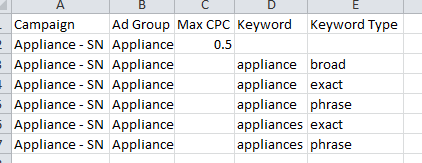
Now you have your list, fire up Excel and put in headings for Campaign, Ad Group, Max CPC, Keyword, and Keyword Type – It should look something like this:
Decide on a naming structure for your campaigns. In HeroShop’s case I want my appliance type followed by “- SN” to signify this campaign is on the search network. This is also a good time to decide on your ad group Max CPC – I typically go with my desired Cost Per Acquisition multiplied by my average account Conversion Rate. For simplicity in this example I’m going with $0.50.
My first, generic appliance ad group looks like this:
Now we’re going to start expanding this list to include all the relevant keywords we dug up in our research earlier. I’m going to start with “buy”:

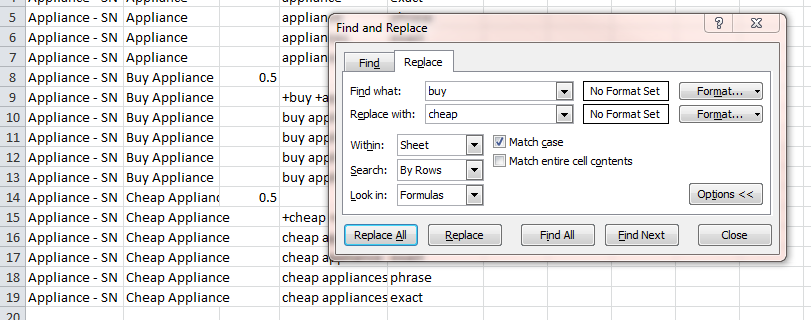
Once I have this I can quickly replicate this ad group for all of my keywords using copy and paste, and then by using find and replace to change out the word “buy” for the word “cheap”.
Eventually you should have a long list of all the ad groups you wish to set up based around a number of different keywords. Once we have this template created we want to move onto our second template which focusses on the variations in the TV products. Here I’ve created a new file into which I can copy and paste all my different brands and size information.
I’d like to point out at this point that you can start making any combination of these different keyword lists that you feel you need in your account – For clarity’s sake I am keeping my lists simplified in the example.
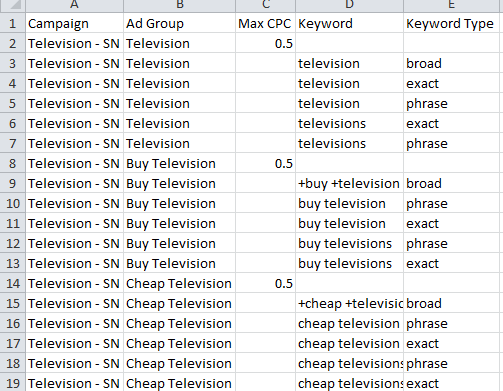
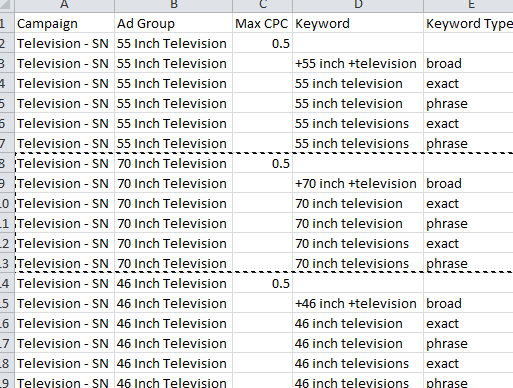
At this point we have two long lists of keywords – one focussed on our buying terms, and one focussed on our product types. With a quick find and replace of “Appliance” with “Television” and “appliance” with “television” my first list is suddenly filled out and ready to go.
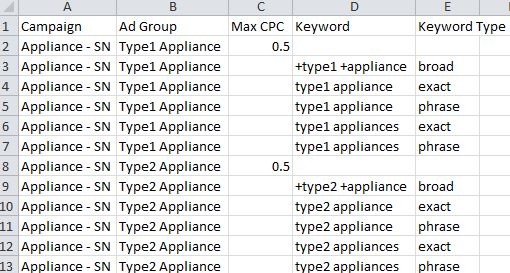
Repeat the process for your ‘type’ template, while also replacing “type1” with (in my case) “55 inch” and so on, to get something that looks like this:
Now, not only do you have a pretty full list of keywords and ad groups for one campaign, but you also have two templates you can easily use to replicate the process across any number of different appliances. The first campaign might have taken you a while, but the next nine appliances should be really quick and easy to set up.
Ads:
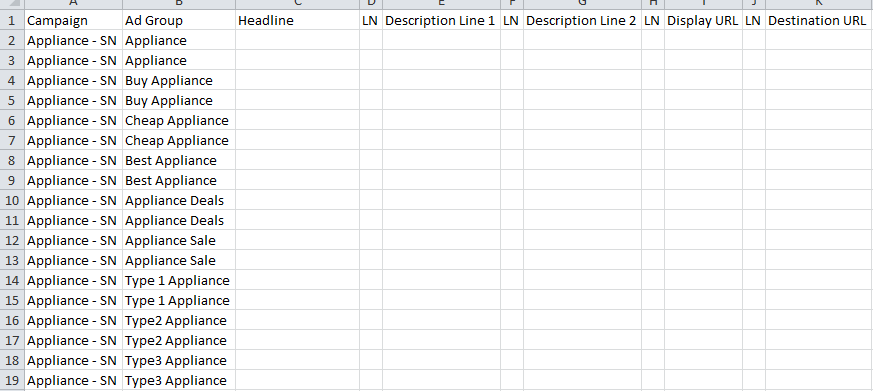
The other side of the coin is that we also need to create an ad template. You’ll want to decide how many ad variations you are comfortable running – in my case it will be two, as that should produce a winner in the shortest time possible. You’ll want to create a template with a list of your ad groups (two for each as we want two ads), and which includes the headings “headline”, “description line 1”, “description line 2”, “display URL”, and “destination URL”. See below for an example of a template ready for us to start writing ads for:
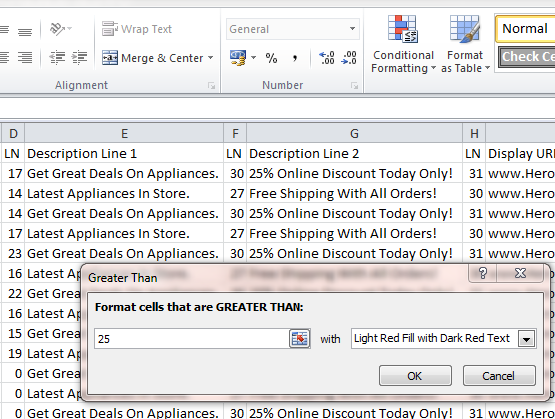
Notice the “LN” column headings? Those are so we can make sure our ads don’t go over the allowed limits: 25 characters for the headline and 35 for each of the description lines and the display URL. To do this we use the function =LEN(“Cell Number”) and Excel will display the number of characters for us. We can also add in conditional formatting so any over our limits highlight as red. To do that first highlight your LN row, then select conditional formatting on your home menu and set your character limit.
Now write your ads! I’m using two ad variations and copying them across all my ad groups for description lines 1 and 2, and being a bit more manual with my headlines. See below for how your template might look:
Phew! Start find and replacing like mad to get your ad template to reflect your keyword templates until you get something like my example below:
See – that wasn’t so hard was it? Luckily for us, none of these ads went over the length limits, but if they had done you would need to remember to go back and edit them before uploading.
We’ve spent a while creating some good templates for televisions, but the next nine campaigns should be a breeze. Sure, you’ll have to go back and make a few tweaks, but the majority of the work has already been done. Remember, specific products or keywords can still be added in later once we’ve finished with our templating, so don’t worry if you some of your products or services are tricky to shoehorn into these templates.
Uploading
Save your templates as .csv so you can upload them into the AdWords Editor using ‘Import CSV’ in the File menu. Use Editor to check your campaign settings and to look for any other silly mistakes. Once you’re happy with your new campaigns, post your new campaigns and watch them fly!
Summary
Hopefully this guide will have been helpful to those of you new to using Excel templates, and has helped demonstrate how you might be able to get 10 new campaigns set up in no time at all! If you have any particular questions about anything shown or have your own template building tips, please share in the comment section below.


