


Google Analytics Settings
Google Analytics is vital to gaining business insights about your website. The most important takeaway is that your analytics can unquestionably lead your business to better decisions. Out of the box, Google Analytics is tremendously powerful.
When you take the time and dedicate the business resources to the customization of Google Analytics the result will be more meaningful, contextual data for your organization. Certainly you can get by on the standard implementation settings, but we want you to take your data to the next level.
An analytics professional working with your development team can put together the coding requirements and measurement plans so you make more informed assessments around your marketing mix and spend within each channel.
What is Google Analytics?
Google Analytics is a widely used free online tracking tool provided by Google. The tool provides you with the ability to measure how many people come to your website, what those people do when they get to your website, and much more.
How Google Analytics Works
There are 4 main components to Google Analytics.
- Data Collection – Google Analytics can gather data from websites, mobile applications and even kiosks or point of sale systems.
- Configuration – These are the settings you control in Google Analytics. Your configuration will define what you see in the online interface. We will discuss all of these settings in this guide.
- Processing – Processing is the step where your data is transformed according to your configuration settings and then stored in the Google Analytics database for output. It is essential to know that the data cannot be altered at this point.
- Reporting – Reporting takes place in the Google interface for Google Analytics, but comparably to other Google products you can also extract data using the core reporting API and then pull the data into into custom applications.
Account Structure
Prior to setting up Google Analytics it is important that you conceptually understand the account structure.
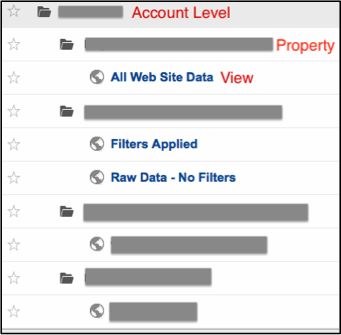
Account – This level is the highest in Google Analytics. An account is the umbrella for an entity to categorize data from all digital resources together.
Properties – Each account can have one or multiple web properties with a unique tracking ID. The ID tells Google which data to collect, store, and report to you. Normally you would want to build individual accounts for unique businesses, or distinct business divisions. While this makes it easy to view data from each asset independently it does not allow you to view data in aggregate across multiple digital properties. If you decide you want to see the data collected as one unit versus as a single property you would need to adjust your implementation settings and use a single tracking ID. This is frequently called roll-up reporting.
Views – For each property you have the choice to create different views of your data. If you want a unique assessment of the data, use the configuration settings in your account to outline each view. Usually you make several views for each property to keep and manage your data. For example, suppose you have different sales teams for each geographic region and you want a view for each region. You can then give each sales team a view. We recommend at least 3 views. You should create raw unfiltered view and then we recommend a master view as well as a test view.
Once GA processes data, it cannot be changed! Or, once you delete a view it cannot be restored. Also, when you create a new view it doesn’t use historical data as it starts from the date of creation.
Setting Up Google Analytics
Setting up Google Analytics is a very simple process.
Step 1: Sign into your Google Account
Step 2: Go to Google Analytics
Step 3: Click on Admin
Step 4: Copy the code
Step 5: Paste the code onto every page on your website that you want to track
Step 6: Verify your setup


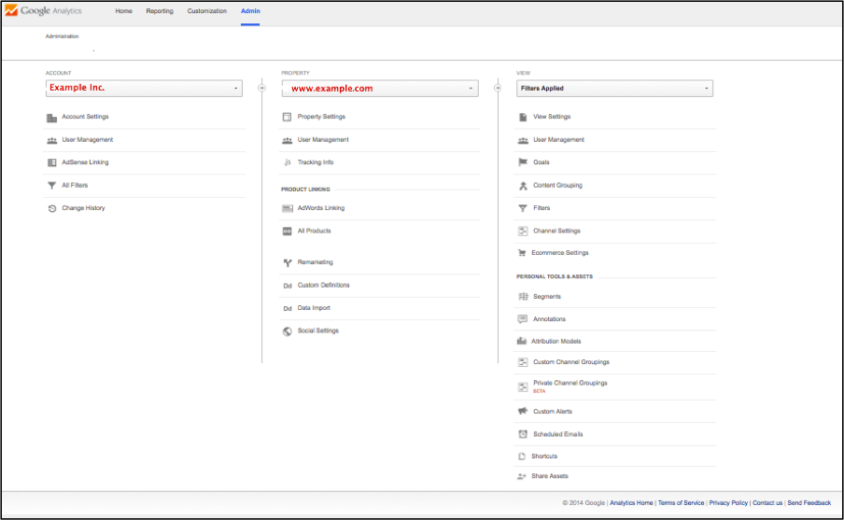
Account Level Settings
Once the tracking on your website has been verified you are ready to start customizing your Google Analytics Account. Each Google Analytics account has a hierarchy. At the highest level is the Account. You can have more than one account. For example, if you want to collect data for your company you can create one account. Suppose your company wants to track multiple websites, you can create a property under each account, or you can chose track each website in a separate account. If you are a marketing agency and you have multiple clients you would definitely want each client in independent accounts.

Basic Data Sharing Settings
Under basic account settings you can decide to share high-level data with Google to improve Google Analytics. The data within Google Analytics is secure and protected but Google asks via checkboxes if your company will allow data sharing to improve the product. This is where you can decide to share data as well as opt in for technical support and account specialist support from Google. If you check these boxes, periodically your account may qualify for emails and calls from Google to improve your level of service.
This section is also where you choose to accept the Data Processing Amendment, which is for European analytics users. It is the result of data protection laws in Europe. You only need to agree to this data amendment if your business is established in one of the member states.

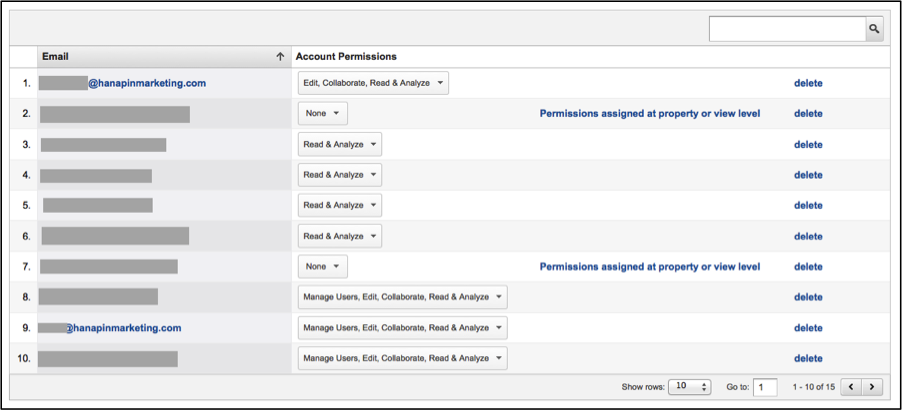
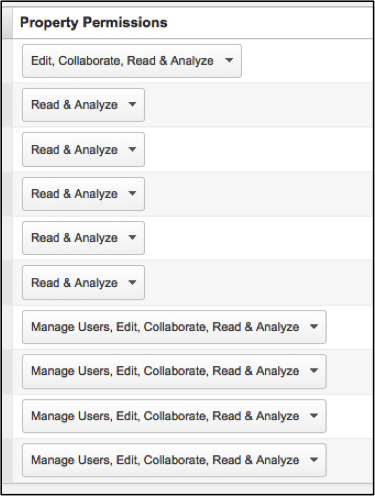
User Management
Users can be managed at the Account level in Google Analytics. You change permissions based on the business need of that individual. The highest level would be to check all the boxes: manage users, edit, collaborate, and read & analyze.
Edit – Edit gives the user permissions to add/edit and delete accounts, properties, profiles, goals, and filters in Google Analytics. A user with edit rights cannot add or edit users.
Read & Analyze – A user with view permissions can only view reports. This setting is the most basic level of permission.
Collaborate – Users with this permission level can create custom reports and dashboards to share with the team.
Manage Users: This user has the ability to manage users of a Google Analytics account as well as assign permissions to the users.
It is important to understand that all these user permissions are unique. A user that has been set up and granted the ability to manage users can only perform user management. You would need to select all permission boxes to have full permissions in a Google Analytics account.
Lastly, user permissions at the account level apply to the rest of the Google Analytics hierarchy. This means if you grant a user edit, view, and manage users permissions, then the property and profile will inherit these permissions. You also downgrade a user’s permissions at lower levels of the account. You can also increase permissions. This is an important feature since it permits users to update settings for properties and profiles but not for account as a whole.

AdSense Linking
AdSense linking is an account level setting that enables you to link your Google AdSense ads to your analytics account. If you are displaying any Google banner ads on your website or blog you will be able to track the money you make on these ads and the statistics and data leading to clicks.

Filters
Filters in Google Analytics are used to either include or exclude certain data in your Google Analytics reports. If you set up a new filter today the filter would apply to data going forward. The past data would remain unchanged. You can also use filters to rename URLs that are complex. Filters can be set up at both the account level and the profile level. At the account level they apply to all the profiles under that Google Analytics account. A best practice is to always have an unfiltered view and then various filtered accounts or profiles depending on your business needs.
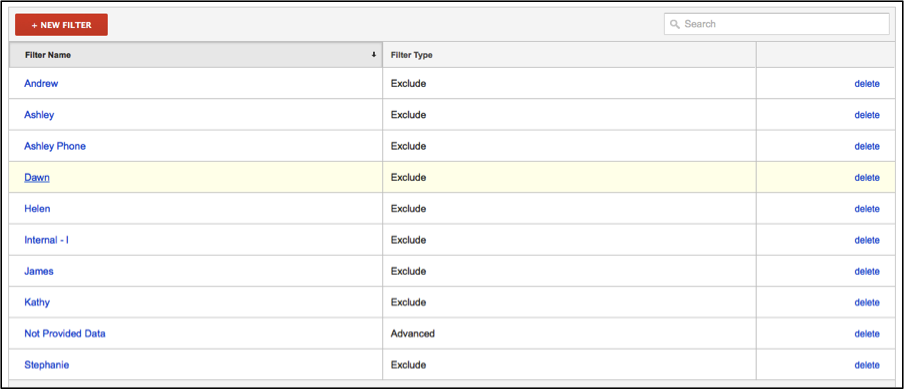
Predefined Filters
Predefined filters can be set up based on the options in the filters drop down list. One of the most common filters would be to exclude internal IP address traffic. With this filter you are not including traffic coming from your organization. If your organization is large and has multiple locations, you can use the IP Address Range Tool.

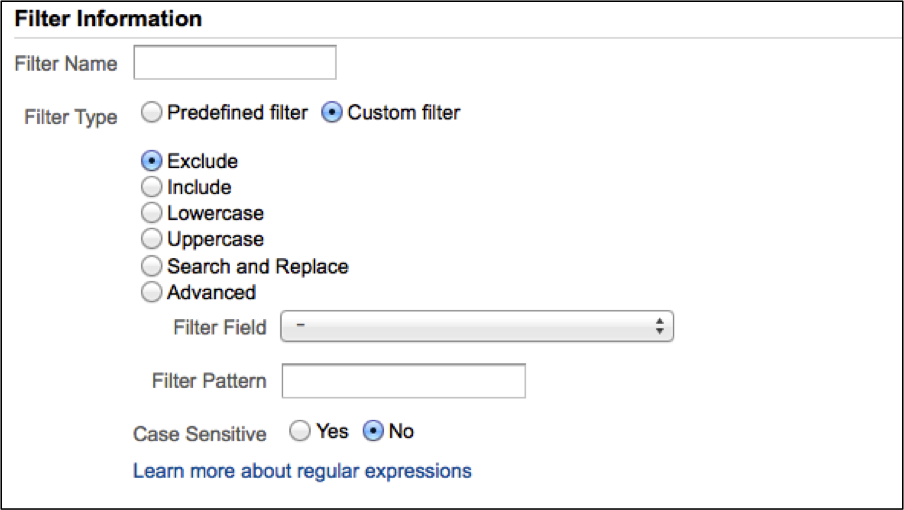
Custom Filters
Custom filters are more complex as they are built using expressions. A common reason you would want to use a custom filter would be to rewrite a URI. (Uniform Resource Identifier, server side and not as friendly as a URL) Some content management systems call the same page using different URIs. A homepage might be www.xyz.com as well as www.xyz.com/index., using Using a custom filter you would be able to see this page using one URI. We will go into more details about custom filters further down in this guide.
Change History
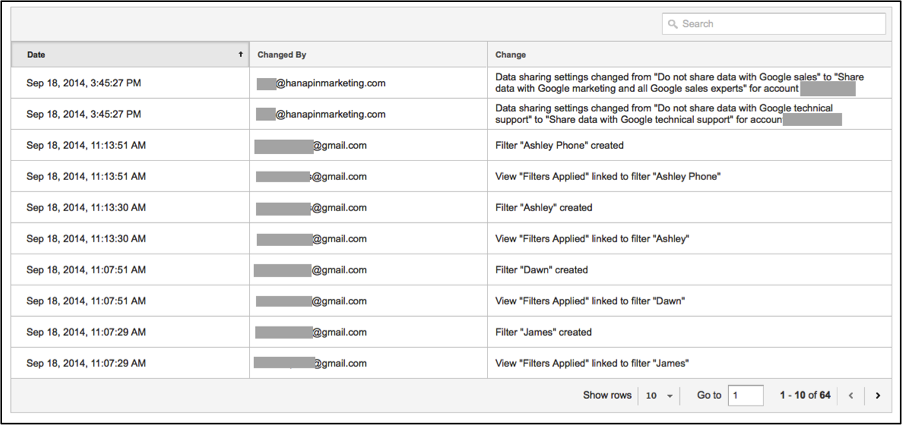
Much like other Google products, Google Analytics also has a log of changes so you can review setting updates within your account. The change history can be seen at the administrator level under Admin. You can review changes to account settings; users, profiles, goals and filters, and the change history will list both additions and deletions.
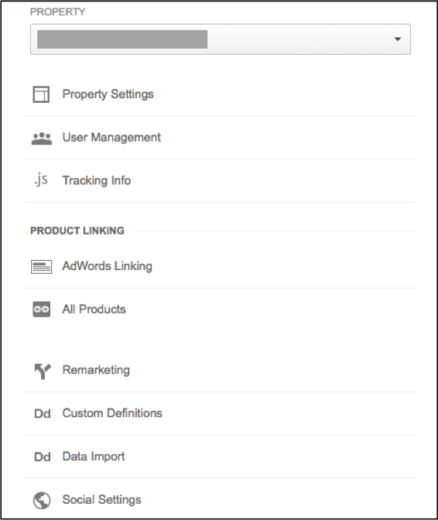
Property Settings
As we covered earlier in this Ultimate Guide to Google Analytics, the hierarchy order is Account, Property, and lastly Profile. A property is data that has been organized according to certain settings. It could be a website, point-of-sale system or a mobile application.
User Management
Similarly to the user management settings that can be applied at the account level, user management they can also be done set at the property level. While we won’t cover the details again, it is important to understand that this means you can assign certain users to certain web properties. For example, you may want your digital account manager to see all web properties, but perhaps the mobile manager may only have permission to see the data for the mobile application. Notice that you will see the permissions and where they are assigned when you look at the account level permissions. When you use permissions at one level they will apply to subordinate levels of the account.
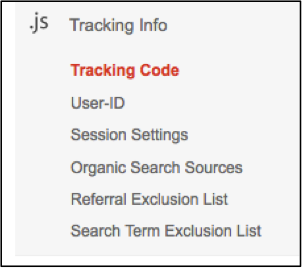
Tracking Info
Since this guide is meant to be a basic comprehensive guide understanding of Google Analytics, we want to give you enough data to get started. The main take-away is that from this section is where the tracking code lives. This area is also where you would set up a new web property you want to track in Google Analytics. If for some reason the web property had an update and the tracking code was removed, this is where you would come to get the code to send to the development team.
![]()
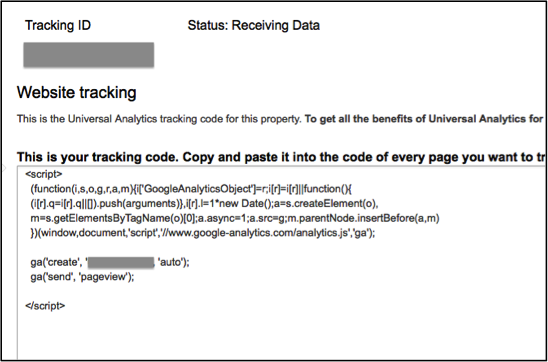
Tracking Code
The tracking code needs to be pasted into the head section of your website on every page you want to track. If the code is not placed on a webpage then Google Analytics will not collect data for that page.
Once you have added the code you will start to see data in real time reports immediately. Google processes data approximately every 4 hours, so it is possible that you could see data the same day, however the Google documentation says that the data will be populated in approximately 24-hours.
![]()
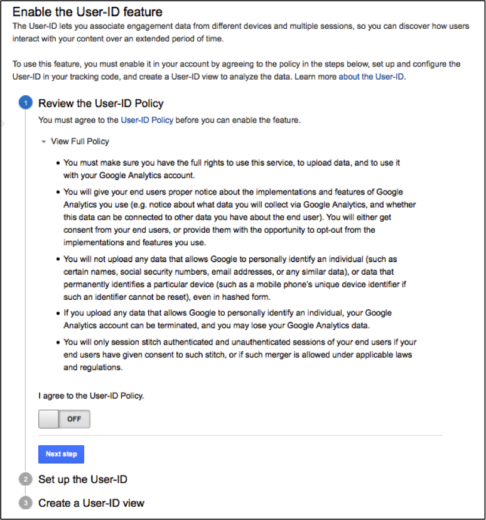
User-ID
One of the challenges across all analytics platforms is the ability to track users across multiple devices. Companies are interested in this data because it can determine where to budget advertising dollars. Customers may browse using a mobile phone and then convert on a tablet or desktop computer.
Google Analytics combats this issue using the User ID feature. The User ID is a piece of data unique to a visitor that can be used to gather statistics from multiple devices and sessions. The User ID associates the data to one unique user. In order to use this feature your website must be capable of producing unique IDs. Once these IDs are created there needs to be a method of assigning these IDs to users. The process of assigning IDs to users would take place within the code on your website. Lastly, these IDs need to be sent back to Google Analytics. The nice part is that you can send the data to Google Analytics with virtually any interaction, such as a click.
Setting up this feature in Google Analytics is fairly simple. You simply need to use the Universal Analytics tracking code. After that you need to allow the User ID in your account. Lastly you will need to implement it in your tracking code. Once these steps are complete, you can create a User ID view in your account.
If you want to view this data you will need to create a User-ID view. Going back to the hierarchy of the account, this view would be under the property. The data in this scenario is filtered and only contains hits including the User ID.
One of the most common questions asked about the User ID feature, is what happens when a user is not logged in. When a user is not logged in Google Analytics simply uses the Client ID by default, because this ID is not unique. Unfortunately as this is not a unique ID, the result is a user can have a Client ID and a User ID. This is where Google uses a process called Session Unification.
The Session Unification is a feature that associates hits with a User ID if they are in the same session. The hits have to be within the same session, meaning if a user clicks around to part of a website prior to logging in, these hits will be associated with that User ID. The caveat is that this must be the first session for that User ID.
Step 1: Enable User ID tracking – Agreeing to the terms and conditions
Step 2: Adding the correct JavaScript tracking code.
Step 3: Creating the User-ID View of your data
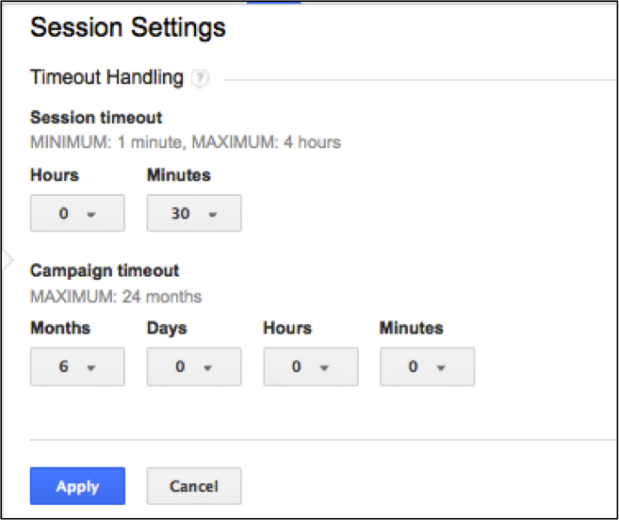
Session Settings
Session settings are where you update how your visits are calculated in Google Analytics. These settings are a significant piece of analytics tracking. To fully understand session settings you need to understand how Google Analytics works.
Google Analytics receives hit level data from the JavaScript code you place on each page. Google Analytics then calculates metrics passed on this initial data hit. The data hit is really a .gif request that is sent to the servers with information about the hit. Part of the information includes visitor level data.
Visitor level data includes information such as city, time, browser, and other metrics. What is important to understand is that a session (previously called a visit) is made up of hits. A visitor can visit the website many times. When the visitor has two or more visits they becoming a returning visitor.
Behind the scenes when a user visits a website, Google Analytics looks for a cookie. If there isn’t a browser cookie than Google Analytics creates one and then the data gets sent to Google Analytics for processing. This means if a users returns to the website within 30 minutes the session continues. Of course you can customize the session timeout handling in your Google Analytics settings to meet your business needs.
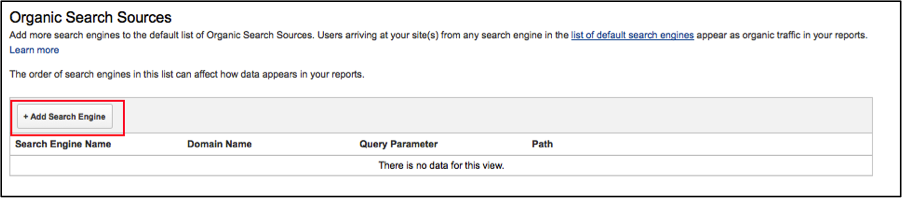
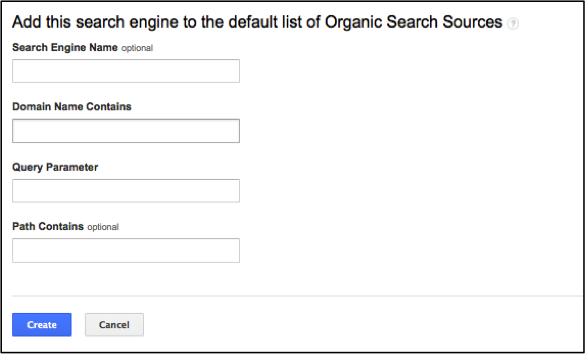
Organic Search Sources
Organic Search Sources is a way to customize search engine recognition within Google Analytics. Google Analytics will report on traffic coming from almost all the search engines, including Google, Bing, Yandex, Baidu and so on. However some search engines are not included in the list. The engines that are not included are searches coming from local internet service providers or meta search engines like Dogpile. The last way that a search could be unrecognizable to Google is if it comes from a toolbar. Some companies lock down computers for employees at work, and all searches go though a toolbar that cannot be removed. Customizing this area of Google Analytics will put the data in the Organic Search Traffic report instead of the Referrals report.
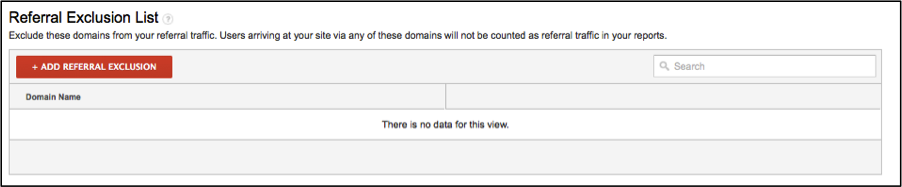
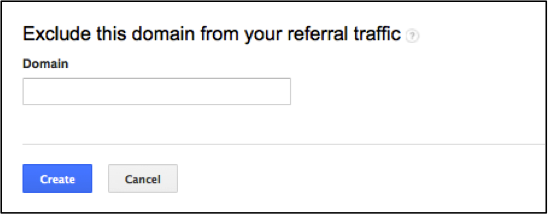
Referral Exclusion List
Referral traffic comes in from other domains. If you have a link on xyz.com, and people click on the link to come to your website, then you will see xyz.com listed as referral traffic. The downside of referral traffic is that some websites end up seeing traffic from their own website in this list. A lot of ecommerce clients use third-party shopping carts and so if you do not add the shopping cart URLs to Google Analytics the customer may check out and come back to the website and be listed as a referral.
The other downside of referral traffic is that by default it is considered a new session. Keep this note in mind when adding sites to the exclusion list. Your session traffic may go down, when in fact you are just seeing a more accurate view of traffic to your website.
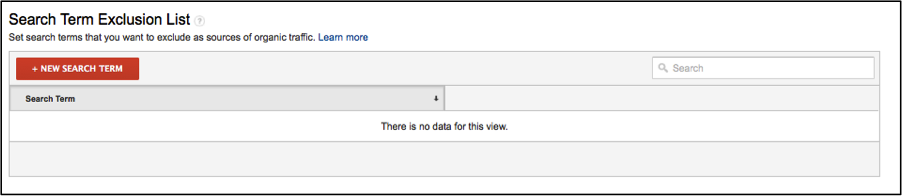
Search Term Exclusion List
Google Analytics tracks search terms that deliver traffic to your websites. If a user is logged in Google will not show the keyword. Instead you will see the search fall into the (not provided) search term.
With the search term exclusion list you can choose terms that you do not want to see in your search terms report and have Google Analytics classify the traffic as direct. You might want to consider taking this action for branded traffic.

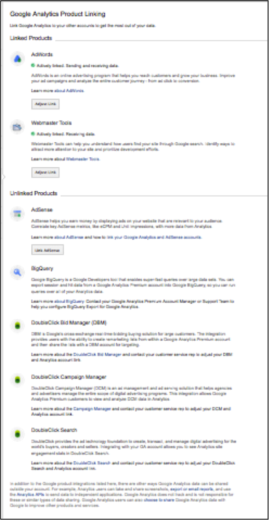
Product Linking
Google Analytics offers many supporting products that you can link to your website. These Google Products include the following:
- AdWords
- Webmaster Tools
- AdSense
- BigQuery
- DoubleClick Bid Manager (DBM)
- DoubleClick Campaign Manager (DCM)
- DoubleClick Search (DS3)
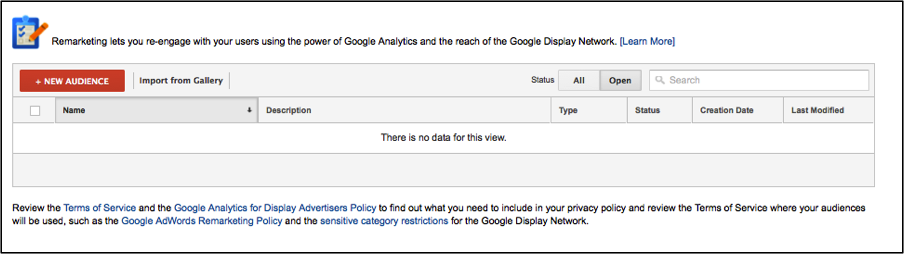
Remarketing
You can manage remarketing lists in Google Analytics, as well as AdWords. As we know from paid search, remarketing allows marketers to show previous visitors to your site targeted ads based on the pages on your site they visited. When a user visits your site they get a cookie and you can target the customer later in Google’s Display Network.
Using remarketing in Google Analytics is very simple. You can create lists based on metrics within analytics such as location or even time on page. The benefit of using remarketing lists from Google analytics is that your lists can be more unique. Using AdWords you can target customers who visited certain pages on your site but if the pages you are using are extremely popular you may want a more engaged audience. For example, an audience that spent over two-minutes on the site looking at content may have a higher propensity to convert. This audience data can be collected for a remarketing list.
In order to build remarketing list using Google Analytics you will need to change the code on the pages, and make sure your site is linked to AdWords. It is also required that you update the privacy policy on your website and accept the terms.
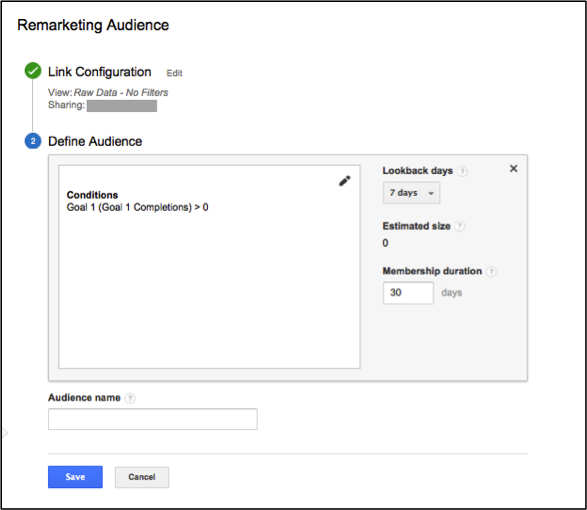
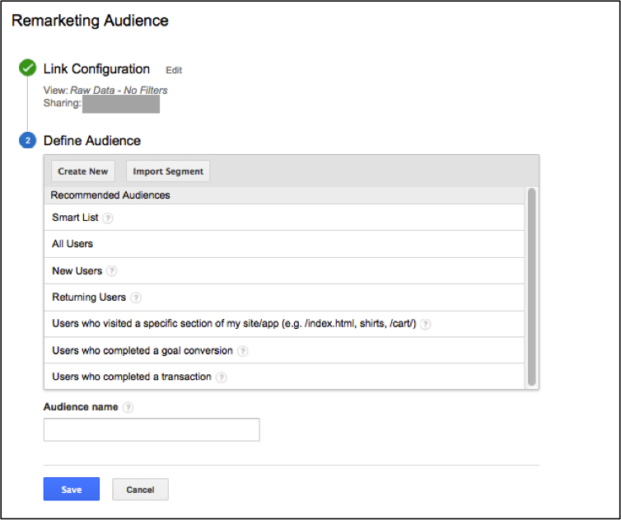
Once you are in the desired Google Analytics account, go to Admin and select remarketing lists. Click new remarketing list and chose the profile you want to use. Next chose which type of list you want to create. You can choose all visitors, visitors who visited a specific page or visitors who completed a conversion goal. Once you give the list a name you should remember that the name cannot be changed. You will also need to choose a membership duration. This duration tells Google Analytics how long before a visitor is removed from the list. You want to have a time-frame that allows for the list to grow in size, but you do not want a time-frame so long that visitors get retargeted past the point of conversion. Once you have set all of this information up you can click “get estimate” to see how large your list could grow. The final step is to choose the AdWords account where the remarketing campaign will live.

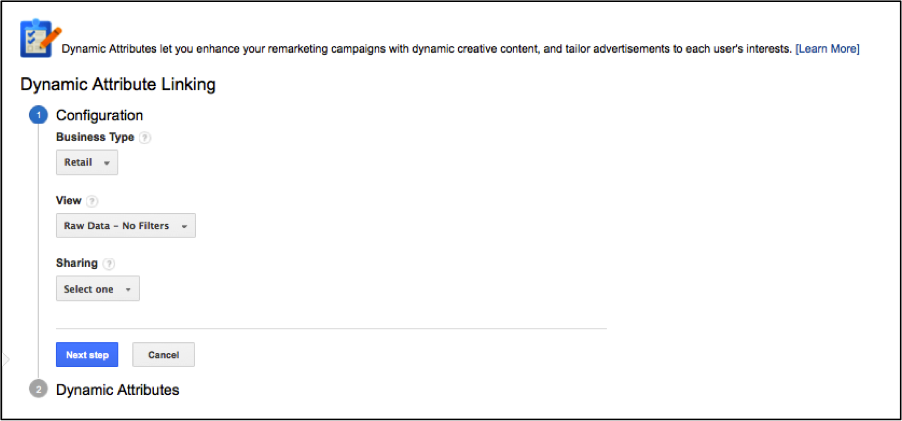
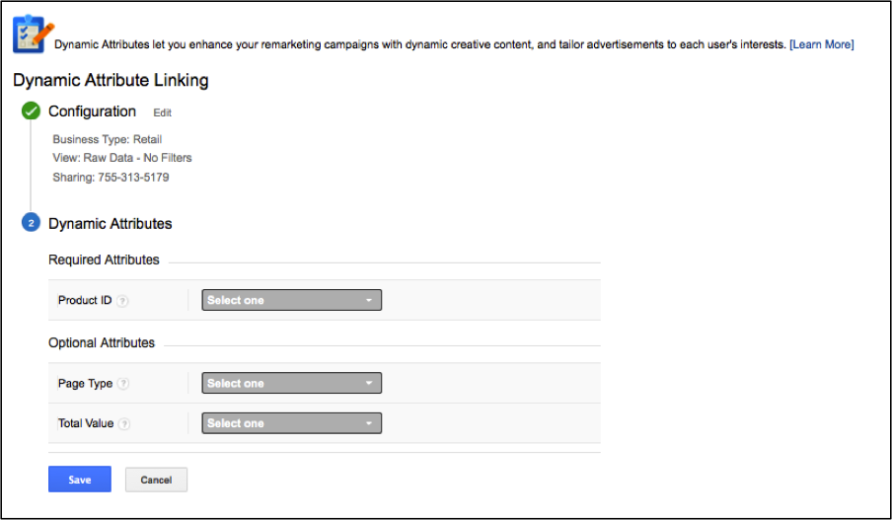
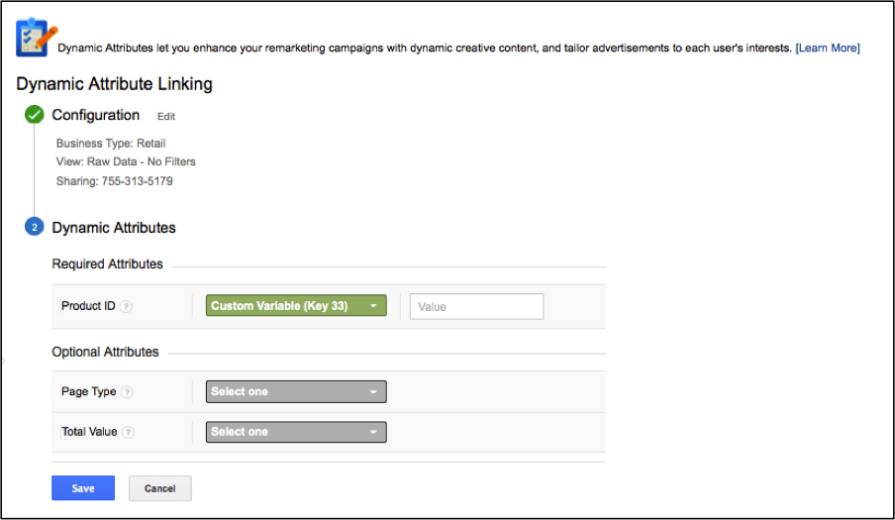
Dynamic Attributes
Dynamic attributes are essentially what we know from AdWords as Dynamic Remarketing. It gives us the ability to remarket based on what we know about the user. If a visitor looked at books on your website and purchased several books we could serve bookmark ads to the visitor at a later point in time.

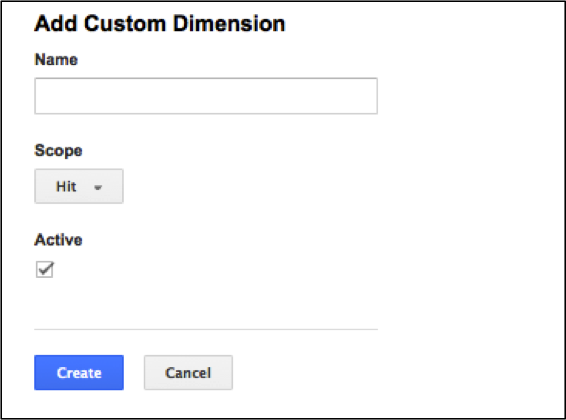
Custom Dimensions
Custom dimensions are easier than they sound. You get 20 in Google Analytics. If you are using the paid version of Google Analytics you get 200. The best way to understand dimensions is to understand that they are descriptions of a visitor. For example, city or source are dimensions because they describe a visitor. You know the visitor came from Ohio and from organic search. In Google Analytics dimensions are the rows.
Step 1: Admin
Step 2: Custom Definitions then “New Custom Dimension”
Step 3: Create a name and click create
Step 4: Chose a Scope (Hit, Session, or User)
A hit can be a page view, event or conversion. When you choose session the value is included on any hits in the current session (default 30 minutes). A User scope would impact values based on the User ID.
Step 5: Click the create button

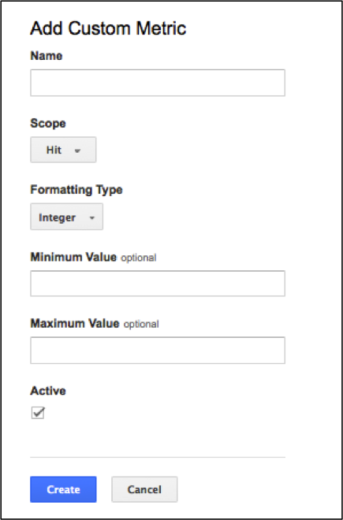
Custom Metrics
Now that you have created custom dimensions you can create custom metrics. Metrics are the data columns in Google Analytics.
Step 1: Click custom metric
Step 2: Click on new custom metric
Step 3: Chose integer, currency or time
Step 4: Click on the create button
The final and last step for your custom definitions will be to get the updated code on your website. You can now create custom reports with your dimensions and metrics.

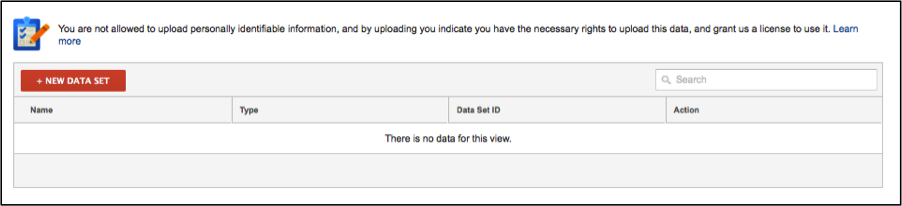
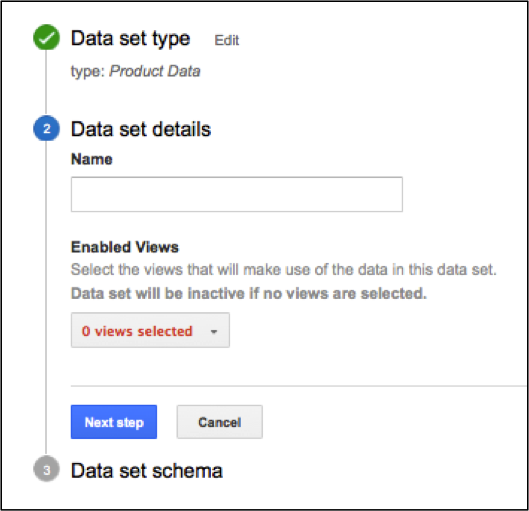
Data Import
In Google Analytics you have the ability to bring new data that is relevant to your business into the software. You can collect additional data using JavaScript or you can use dimension widening. When you use Google’s dimension widening feature, a CSV file is the source to upload information into the system. This is immensely powerful because the additional data can add more context to the reporting in Google Analytics. You can add data such as sales regions or additional customer info such as order number.
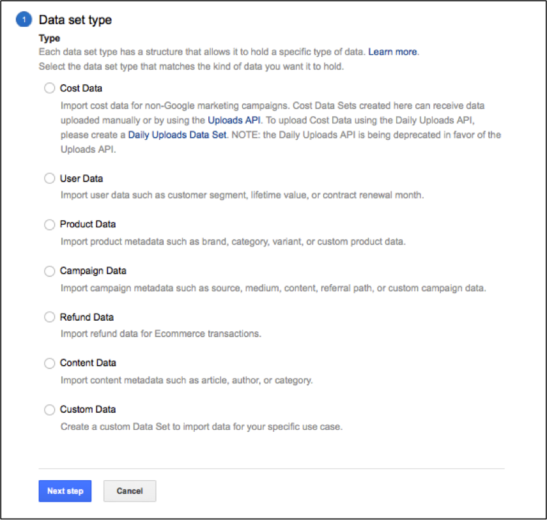
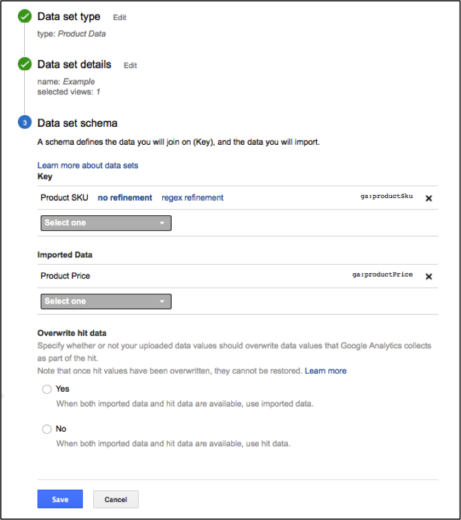
When you import data you can upload either dimensions or metrics. As we discussed earlier a dimension is a description of a user where as a metric is a statistic or a count. You will also need a key. A key is what Google Analytics uses to associate your data with the rows and columns in the system. The last part of the process is that you will need to outline the setup of your data in Google. To do this you will select a property, name the data, and chose a view where you want to see the data. You will then add the schema. This step is where you pick the key.
Google will show you the proper column headings to use in your CSV file. Using the column headings from Google you can create your CSV file. You can then upload your CSV file by choosing to either get more details or to use the Google API key for upload. Click “Get Schema” or “Download The Template”. Downloading the template is easy, or if you just use “Get Schema” you can copy and paste to the top of your CSV file. Once the file is uploaded the data will be processed on the Google side. Another great feature of dimension widening is that you can use custom dimensions and metrics. Earlier in this guide we covered creating custom dimensions and metrics so the only difference in this case is that you would need to set those up first.
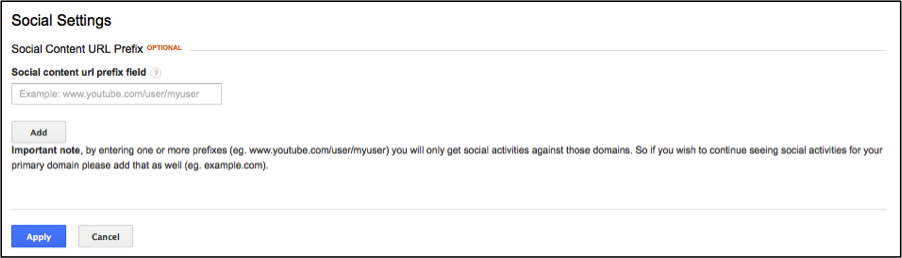
Social Settings
Google Analytics can be set up to track your social media properties. Using Google Analytics you break down the data and see goals and metrics for users who arrived at your site using social media. Setting up Analytics to track social media is easy. You simply go to the social settings area in the Admin section and tell Google the URLs of your social media properties. After this step is done you will see your data in the social reports section. One nice feature of Google Analytics is that it automatically recognizes over 100 different social media URLs, so for the most popular social media referrals you will not need to use the Social Settings section.
View Settings
A view in Google Analytics is the section where you set up criteria for how you want to see the data in your reports. In View Settings you can further refine your data so you can look at your data in subsets versus in aggregate form. For example, users that come in via display advertising may interact and convert differently than users that came to your website via social media. Your Google Analytics views allow you to dig deeper into your data.
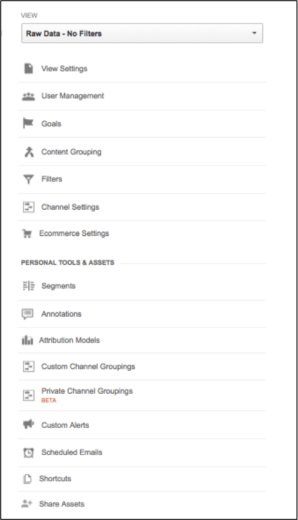
User Management
User management was covered in the account level settings section as well as the property settings section of this guide. You can set user rights at the view level as well. This is the lowest tier in user permissions. You can give the same options as the higher levels in the account hierarchy. A user with permissions at the view level can only have privileges within the given view.
Goals
Goals are one of the most important parts of any analytics tracking platform. In Google Analytics you can set up goals based on any website task that aligns with your business. You can base a goal on time on site, time on page, a certain number of pages per visit, an event such as watching a video, a transaction or visit to a certain URL.
A goal in Google Analytics can be one of 4 types:
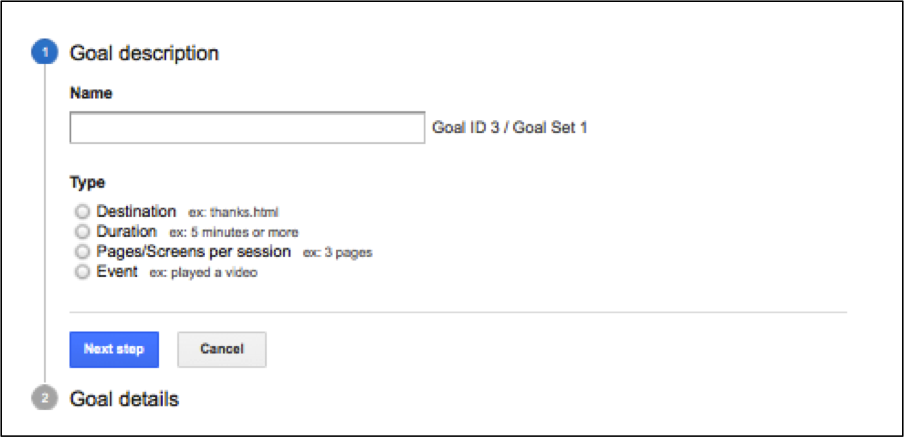
URL Goals – A particular page that a user visits on a website. Sometimes this page can be the confirmation page after a form is filled out, or the thank you page after a user obtains a quote. If the customer makes it though the process a goal value would be triggered as a conversion.
Visit Duration Goals – Sometimes you want a visitor to remain on the site for a certain amount of time. Perhaps you know that visitors who stay on the site for over 3 minutes are a value to your company. If you setup this goal , once a visitor stays on the website for 3 minutes a conversion is triggered.
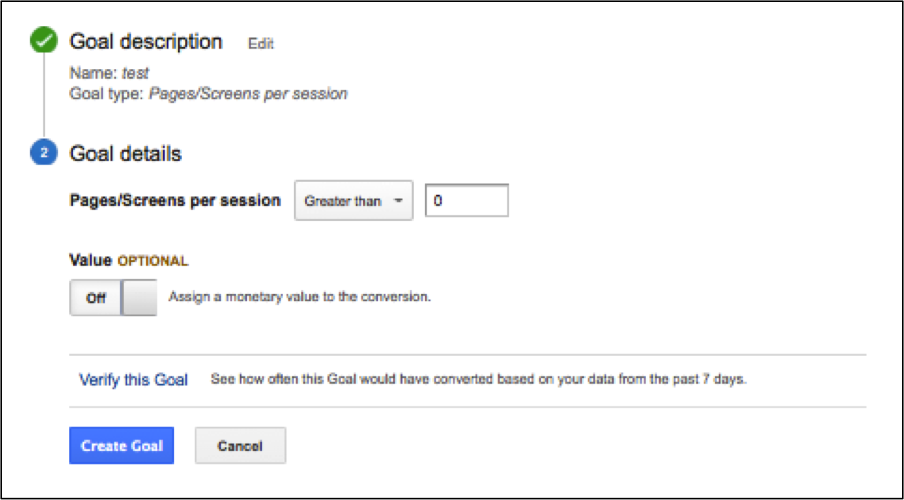
Pages per Session Goals – Pages per visit is similar to visit duration, only instead of measuring the amount of time a visitor spends on your website you are measuring the depth of the visit. You can set a goal to trigger a conversion if a certain threshold of page hits are met.
Event Goals – The best example of an event goal is watching a video online. You can count a conversion based on users watching a video, or playing a game. Another popular event conversion is downloading an application or file.
You set up goals in the Admin section of Google Analytics. Google gives you 20 goals in the free version of the tool.
- Enter a goal name
- Enter the goal type
- And then in the goal details so you can tell Google Analytics how you want to track your goal.
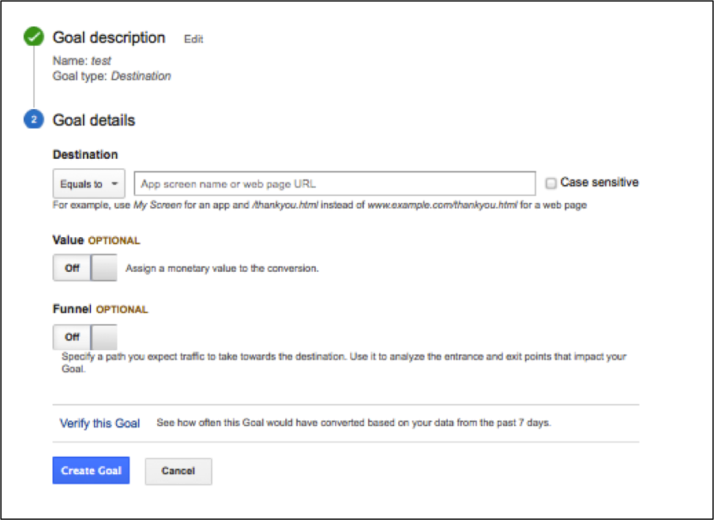
URL Goals
When you are entering the details for URL goals you’ll need to enter a URL. You also need to pick how the URL should be matched. You can chose exact match, head match, or regular expression match.
Exact Match – This is the option to chose when you paste in the entire URL. Google will look for the URL to match exactly.
Head Match – Head match is the matching type you would choose if you wanted to simply match the beginning of a URL, but the information after the part you want to measure can change from page to page. In some cases it is just that the URL has many different parameters so you simply want to match up to the point of similarity in the URL.
Regular Expression Match – Also known as REGEX, is a way to match multiple pages to a goal. It is a method of matching a pattern in a string. One of the most common expression in a goal would be */confirmation.html this REGEX says match to any page that ends in /confirmation.html. These matches can get substantially more complicated depending on your business needs.
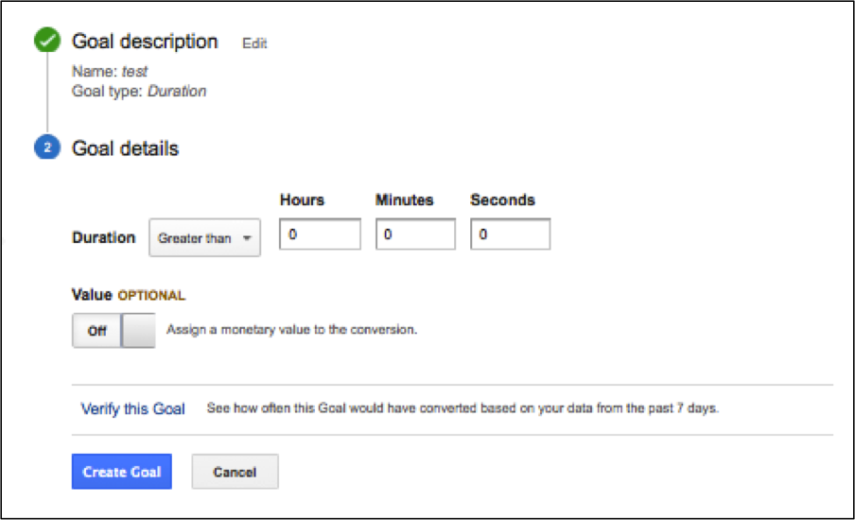
Visit Duration Goals
Visit duration goals are easy to set up as well. The setup is quite similar to the URL Goals in that you match to a URL using the exact, head or regular expression matching. The difference in this goal is that you can select a ‘greater than’ and pick a specific time on the site to use for your goal. Keep in mind you can use ‘greater than’. ‘less than’ or even ‘equal’ in your goal settings. However, most of the time you would be using a ‘greater than’ threshold for a goal.
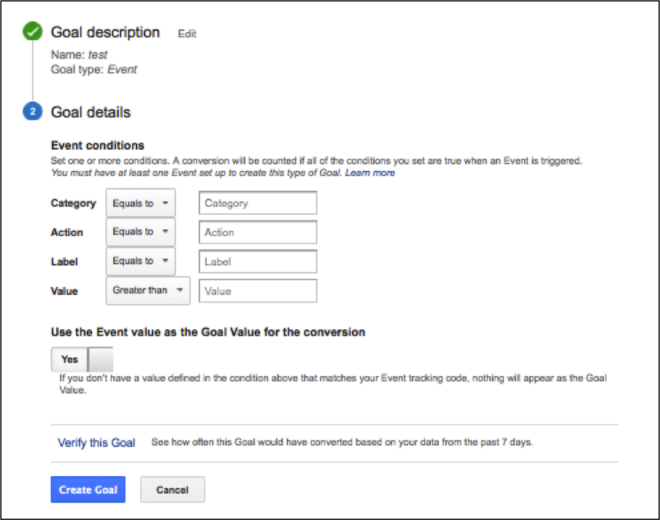
Event Goals
Event goals are a little different to set up. When you go into the Event Goals set up you can chose from 4 different categories:
Category – The most basic option. The most commonly used category is downloading.
Action – This is the beginning of the conversion. For example if someone started to watch a video but did not complete the video you could still count the conversion.
Label – This is where you can assign a label to a string if a conversion occurs on the site.
Value – Sometimes when a goal is achieved you don’t want to simply add a ‘1’, perhaps you want to assign a different value to the goal. This is where you would change this data. In ecommerce you may want to assign a monetary value. Once you add a value you will see this data in the goals.
Once your goals are set up you can see your data in several reports in Google Analytics. One of the most useful reports will be the Goal Funnel report. We will cover all the reports in Part 2 of this guide, but it is important to have a solid understanding of Google Analytics goals, so you can attribute value to actions on your website.
Content Grouping
The content grouping settings in Google Analytics is where you set up groups of pages that all relate. You can create multiple content groupings and within one grouping you can create multiple content groups. A great example for an ecommerce site would be if you wanted to look at the sale pages, the featured pages, or the new product pages.
After you set up content groupings in Google Analytics they will not be exclusive to one report but you will find the dimension in your content reports.
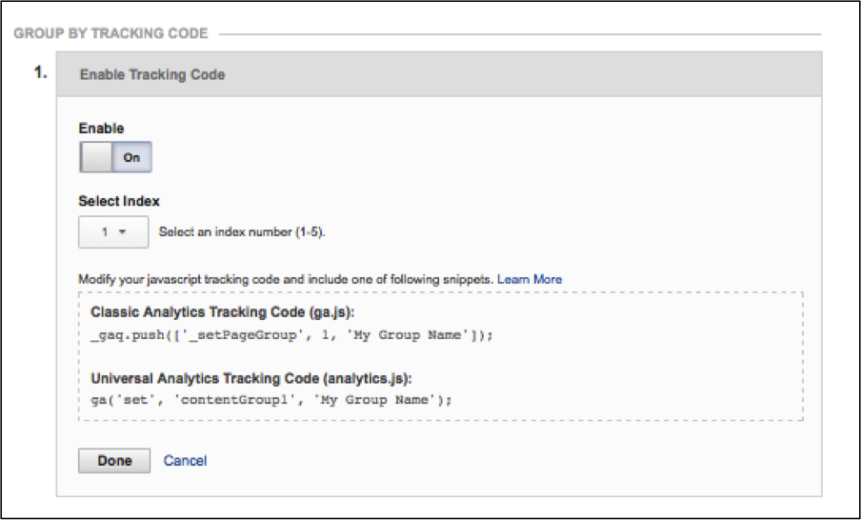
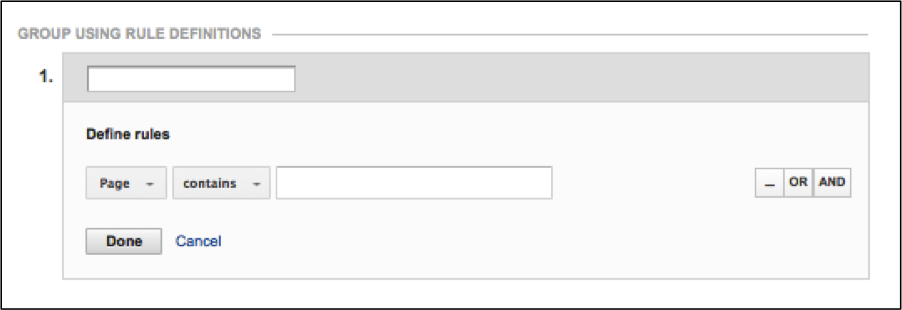
There are three ways you can set up content groupings in Google Analytics.
Code: Using the Universal Tracking Code you can add the content group line to the pages you want to be included in your group. The nice part of this method is that you don’t have to manually create the groups in the Google Analytics admin section.
Extraction Method: This method is fairly easy. You can pull from the drop down and choose pages that contain certain meta data in the title for example. You can use regular expressions to match to the criteria as well.
Rules – Using this method you name the group and then simply set up rules based on what properties the pages have in common.


Filters
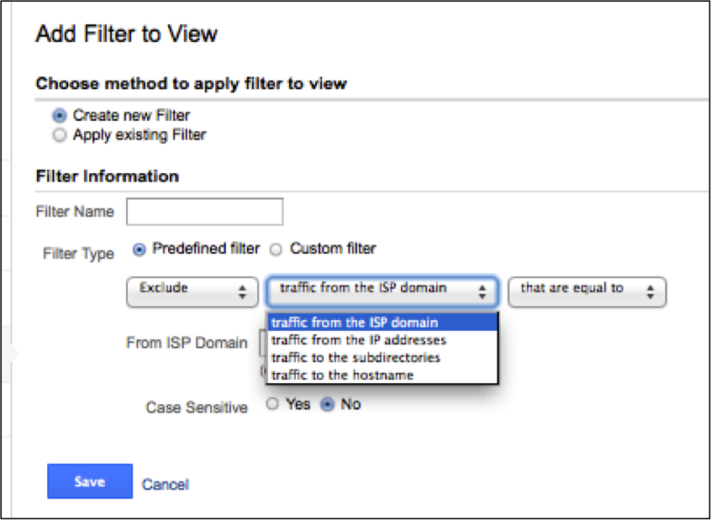
Filters are ways to refine your data. There are times you only want to look at specific traffic sources, such as PPC or Facebook. To set up filters you would once again go into the Admin section of Google Analytics. You can choose to use a pre-defined filter or a custom filter. The pre-defined filters are the easiest because they are one of two types, exclude or include. One of the most popular filters is an exclude filter on internal traffic. If you know your internal IP address you can chose to exclude the traffic coming from that IP. Keep in mind that you will always want to keep an unfiltered view at all times.
If you chose to use a custom filter the options are a little different. You can exclude and include but there are also the options of lowercase, uppercase, search and replace, and advanced. The search and replace is a good option if you have long URLs that are hard to interpret in reports. The upper and lowercase options are a way to change the URLs in reports when the only difference is the title case.

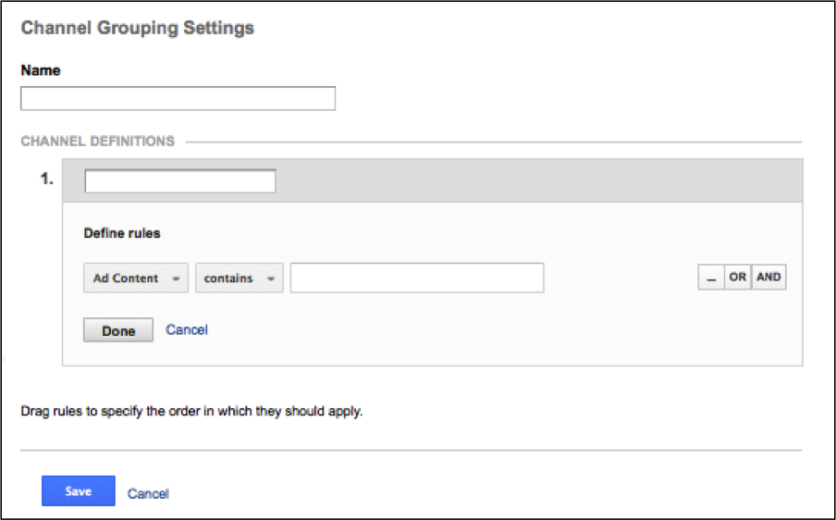
Channel Settings
Google Analytics channel settings are used to understand the visitor. There are 8 default channel settings, which are in the all traffic report. The default channels are:
- Direct Traffic
- Organic Traffic
- Other Advertising
- Social
- Display
- Referral
The disadvantage of using the default channel groupings is that sometimes the data can be attributed to the incorrect bucket. For example if you are using Facebook Ads as a CPC strategy you would not want the traffic to be found under Social. You may want that traffic to be found under Advertising. To get around this issue you can setup custom channels. Similarly to other settings you can update in Google Analytics, you can either set up tracking in the interface or you can tag URLs with code or parameters (UTM).
Step 1: Go to the Channel Grouping settings
Step 2: Click ‘define new channel’
Step 3: Edit the order of your channels

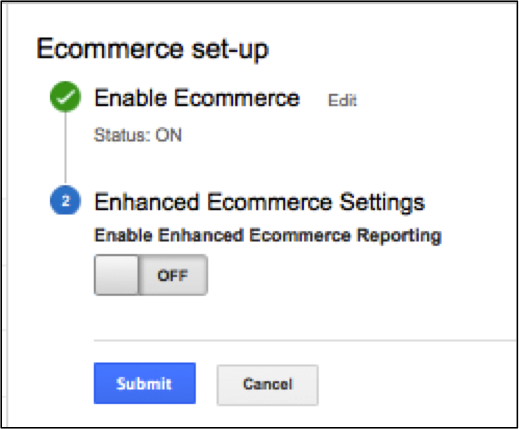
Ecommerce Tracking
Ecommerce tracking is another highly powerful aspect of Google Analytics. Ecommerce sites not only track revenue but they also want to track the number of transactions that occur on the website, average order size, and much more. In order for ecommerce tracking to run, websites must place custom code on the site to send transaction data to Google Analytics.
The first part of Ecommerce Tracking is to outline the cart or path to buy process with all the URLs and steps included. For the most part these paths are similar but some carts require sign up, and there are different steps depending on the business. There are a few required pieces of data for Google Analytics, which are the transaction ID, price, and quantity.
Step 1: Enable the Reports – This is at the profile level, and where you tell Google this is an ecommerce site. This is also where you would set the currency.
Step 2: Tag the final page in the ecommerce process. Normally this is the confirmation page. The ecommerce code is more expanded than the standard Google Analytics code and includes the parameters such as order-id, and SKU.
Personal Tools and Assets
The personal tools and assets settings allow you to share assets within all your Google Analytics accounts as well as manage alerts and emails based on certain criteria.
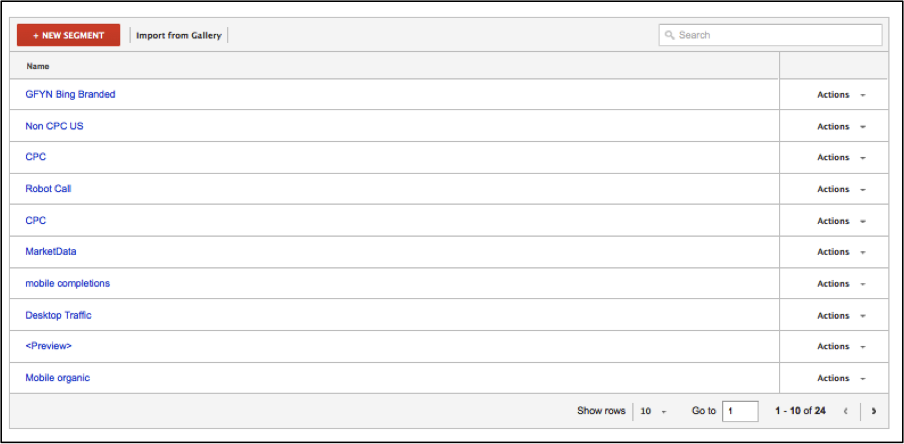
Segments
Google Analytics segments are a key to doing analysis of data sets. Data segmentation is crucial to making business decisions. Most of the power in any data analysis is at the segmented level. How do international users interact with your website, versus people from the United States. You may learn that the bounce rate for international users is significantly higher due to a language barrier. Perhaps organic visitors have a higher time on site than CPC visitors.
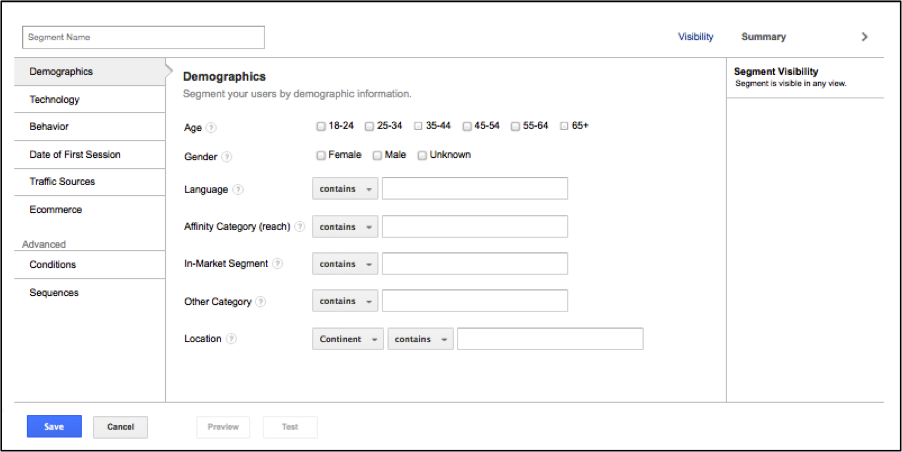
Once you set up segments you can look at all your standard and custom reports within analytics either at the aggregate level or the segmented level of detail. To create custom segments you will follow the following steps.
- Click “new custom segment”
- Chose to segment via demographics, technology or any of the other pre-determined options or you could create your segment based on conditions.
- Preview the results
- And save
Lastly you can share these segments with your fellow Google Analytics friends.
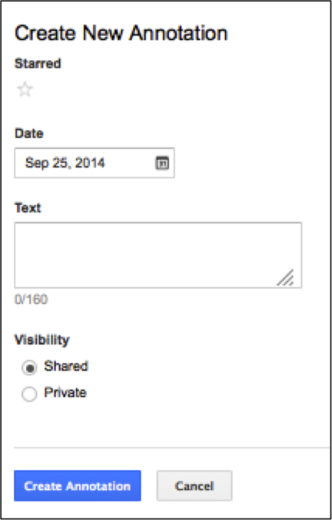
Annotations
The best way to think of annotations is that they are like Post-It notes for your analytics accounts. Good applications of annotations include, campaign changes, seasonality or promotions causing upticks in traffic, changes to Google Analytics settings that impact data processing going forward, and more.
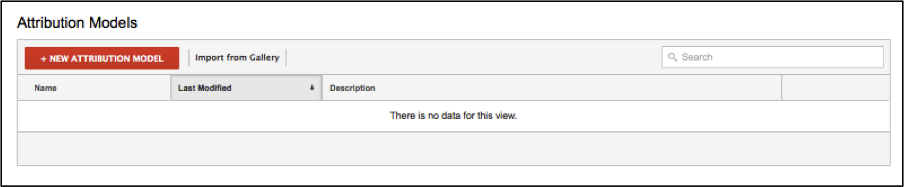
Attribution Models
Google Attribution models could be an entire guide in itself. While we won’t get into all the different pre-built attribution and pros and cons of each in this guide, we will outline that if you want to set up custom attribution modeling this is the place in Google Analytics where you would set it up.
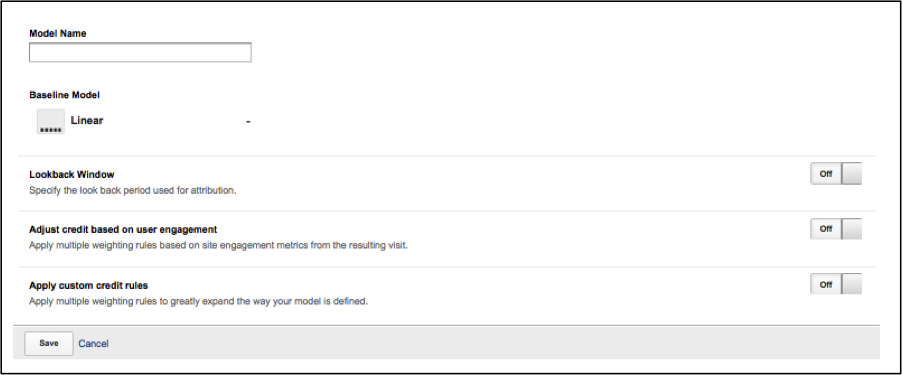
The steps are fairly easy to set up and you would want to set up custom attribution models if you want to give varied weights to each step in the conversion process. (Amanda covers some of attribution modeling in this post).
Step 1: Set up New Attribution Model
Step 2: Chose ‘Create New Custom Model’
Step 3: Name your model
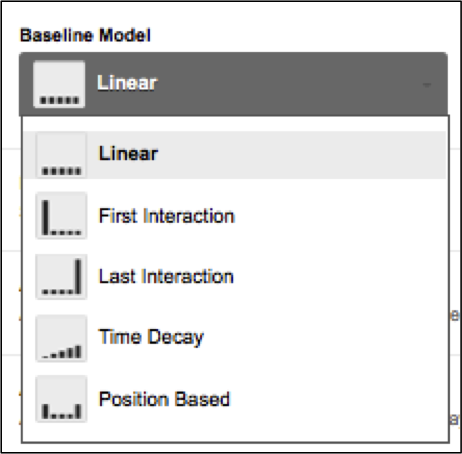
Step 4: Create new rules and weights/look back window
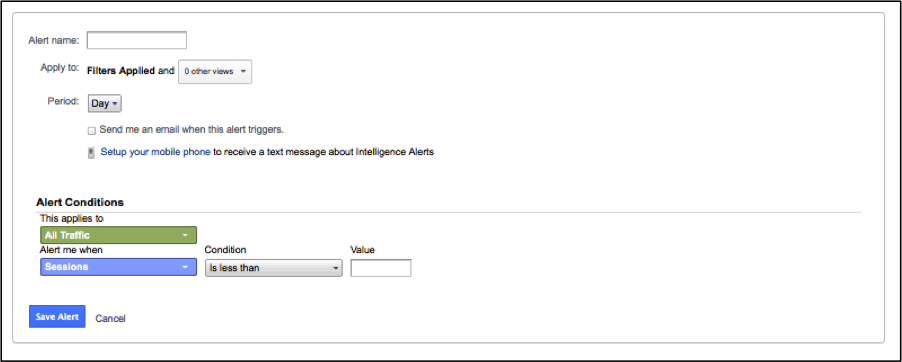
Custom Alerts
In Google Analytics you can create custom alerts to notify you if data needs an immediate response. They can be set up as emails or even text messages to let you know something has gone awry.
- Select the profile for the alert
- Select your notification timeframe
- Identify the information you want to monitor with metrics
- Set a level for the alert action.

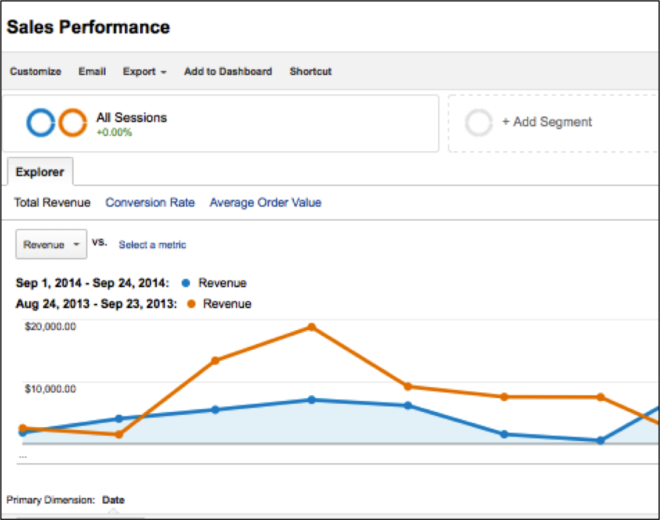
Scheduled Emails
Scheduled emails are a feature in Google Analytics that enables you to schedule and email reports according to a predetermined schedule. To set these up you click the email button while you are in the report view and you then set up your schedule. You will then see a list of all your scheduled reports in the administration section of Google Analytics.

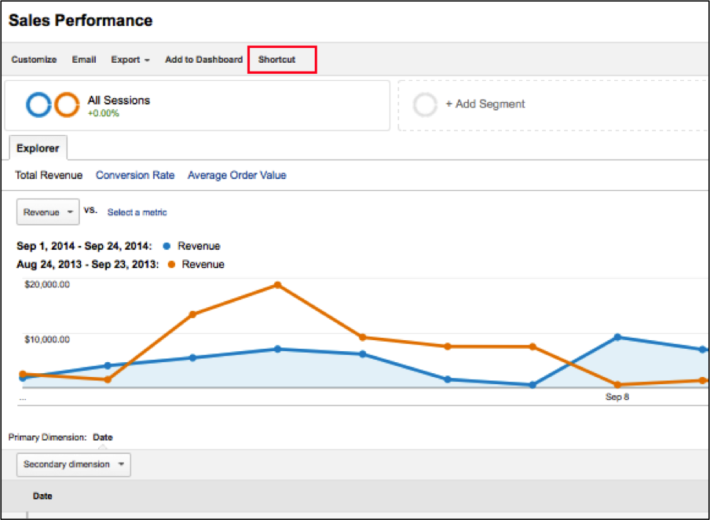
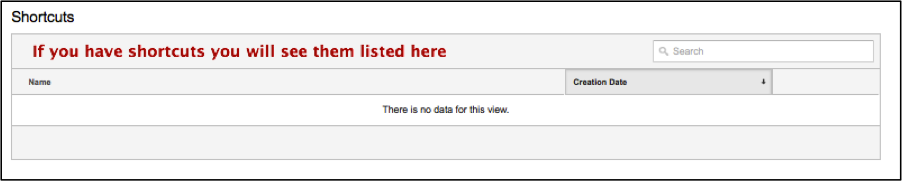
Shortcuts
Shortcuts are great for deep analysis and for when you think you might need to retrace your steps and logic. If you are working on analysis in Google Analytics and you have applied segments and filtered your data, you can save as a shortcut and eliminate having to retrace your clicks and steps.
Similarly to scheduled emails you set shortcuts up from the reporting view of Google Analytics. In the administration section you will see a list of all your shortcuts.

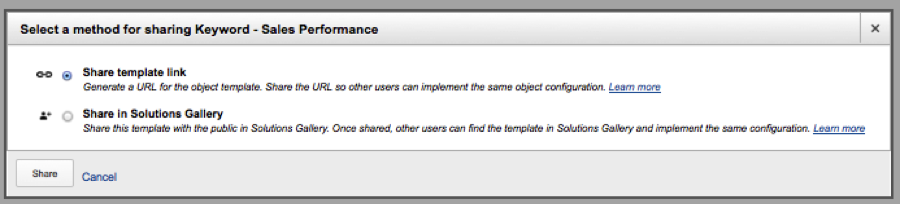
Sharing Assets
Using permalinks Google Analytics has the ability to share configuration settings without sharing the data. So if you build a great dashboard, custom report, or segment, then go ahead and share the asset.

And if you made if it this far in the guide here is a custom report that I created to look at the specific keywords driving revenue in Google Analytics:
Click Here to Download Free Google Analytics Report
“Share your knowledge. It is a way to achieve immortality.”
– Dalai Lama XIV
