
LinkedIn is one of the most underappreciated PPC platforms today for 2 reasons.
First, the awesome targeting capabilities. You can target by geography, job function, job title, job seniority, company, industry, gender, age, skills and groups. Since LinkedIn users create very detailed profiles to help their professional networking, the targeting is quite accurate and gets you in front of crowds that are extremely hard to reach otherwise.
Second, and most important, LinkedIn users are in a business mindset. They don’t dawdle around LinkedIn watching Ice Bucket Challenge videos or look at cat pictures, they’re there to make connections, research a company (for an interview or sales opportunity), improve their profile (which is essentially a digital résumé), and vet a future boss or potential employee. They’re focused.
So how do you get started advertising to the 313 million LinkedIn users? I’ll take your through it one step at a time.
Creating Your First Campaigns
The LinkedIn dashboard is pretty straight-forward. You’ve got tabs for Campaigns, Reporting, Billing, and Settings (also a Users tab for business accounts). The date range is in the upper right as you’re probably familiar with and then you have a performance graph and campaign list. Here’s what it looks like:
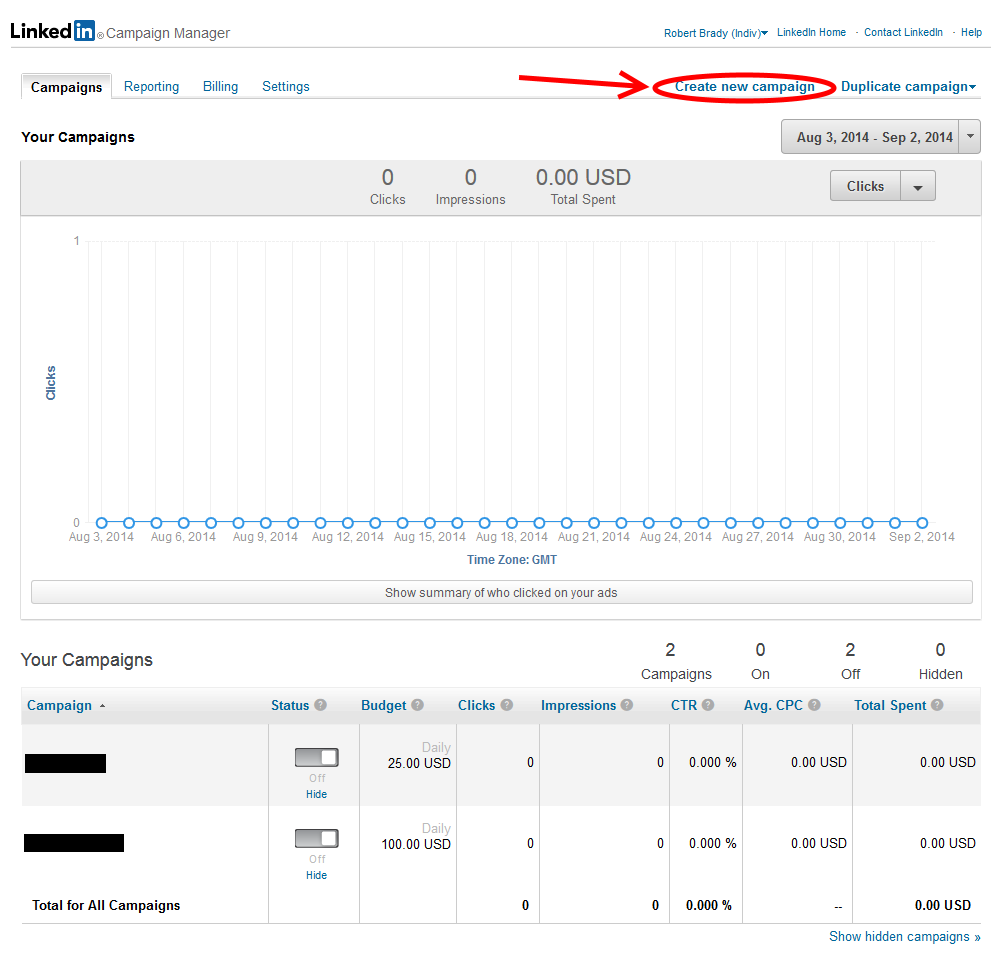
As you can see, we’ll start with the “Create new campaign” link.
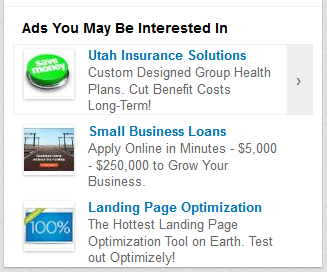
You have two options with a campaign. You can create an ad or sponsor content. This decision affects where your ads will appear. Regular ads appear in the right column, three at a time, to LinkedIn users. The ad can have up to 25 characters in the headline, up to 75 in the body of the ad, and includes a 50×50 image. Here’s a unit I saw recently:
Sponsored content ads will appear in a user’s main feed and appear just like a post from a connection, except for a small “Sponsored” tag in grey. Here is sponsored content (top) and a regular post. Notice how similar they look.

Sponsored content gets significantly better CTR than regular ads (not hard since 0.030% CTR is pretty average for regular ads), but they have higher minimum CPCs. Test to determine what works better for you.
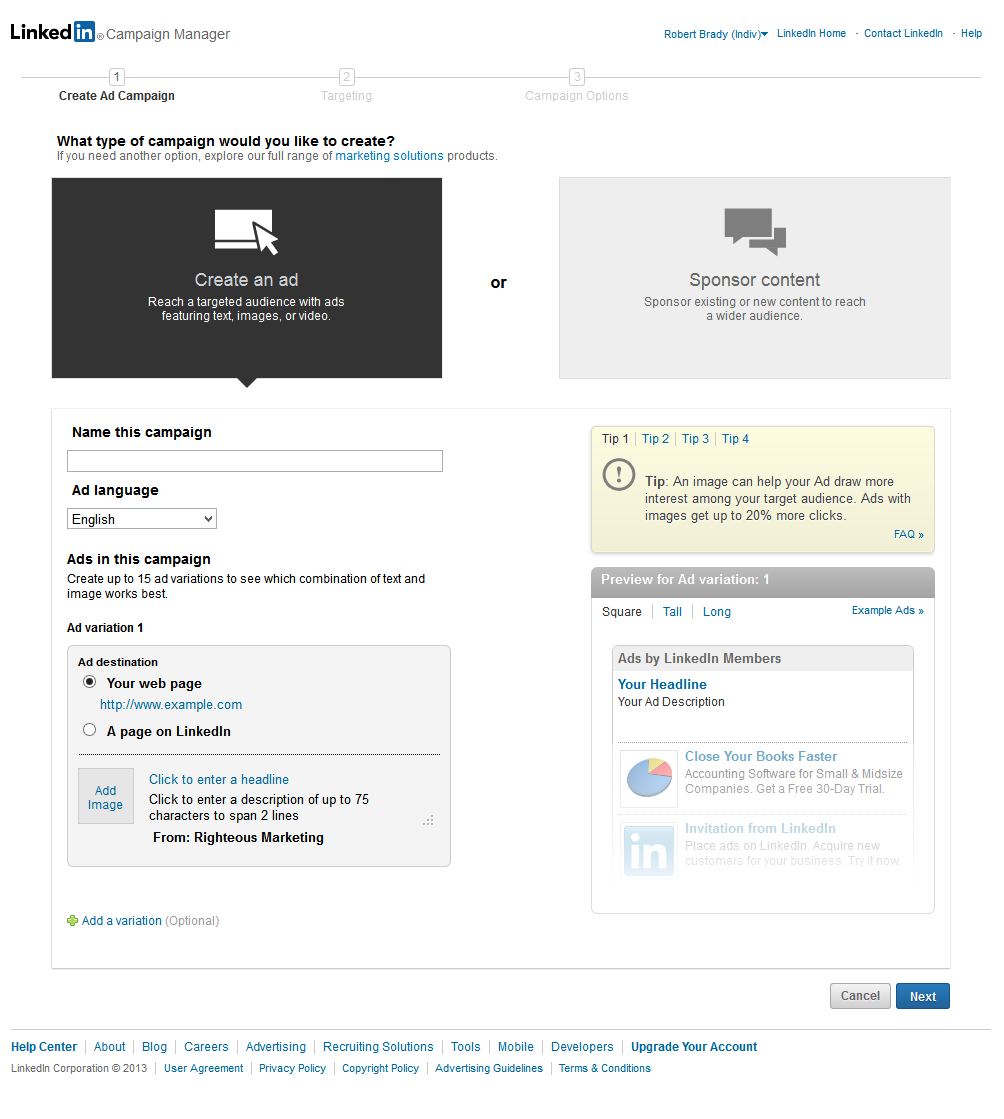
Create An Ad
For a regular right-side ad you begin by naming the campaign, choosing the language, and creating your first ad. As mentioned previously, the headline can be up to 25 characters, the ad can be up to 75 characters, and the image is 50×50. You’ll see a preview on the right of what your ad will look like.
For sponsored content you again name the campaign & choose a language. You select the company in the drop-down box and then recent posts will populate the box. If you’re promoting something that was already posted to your company page, select it and move on.
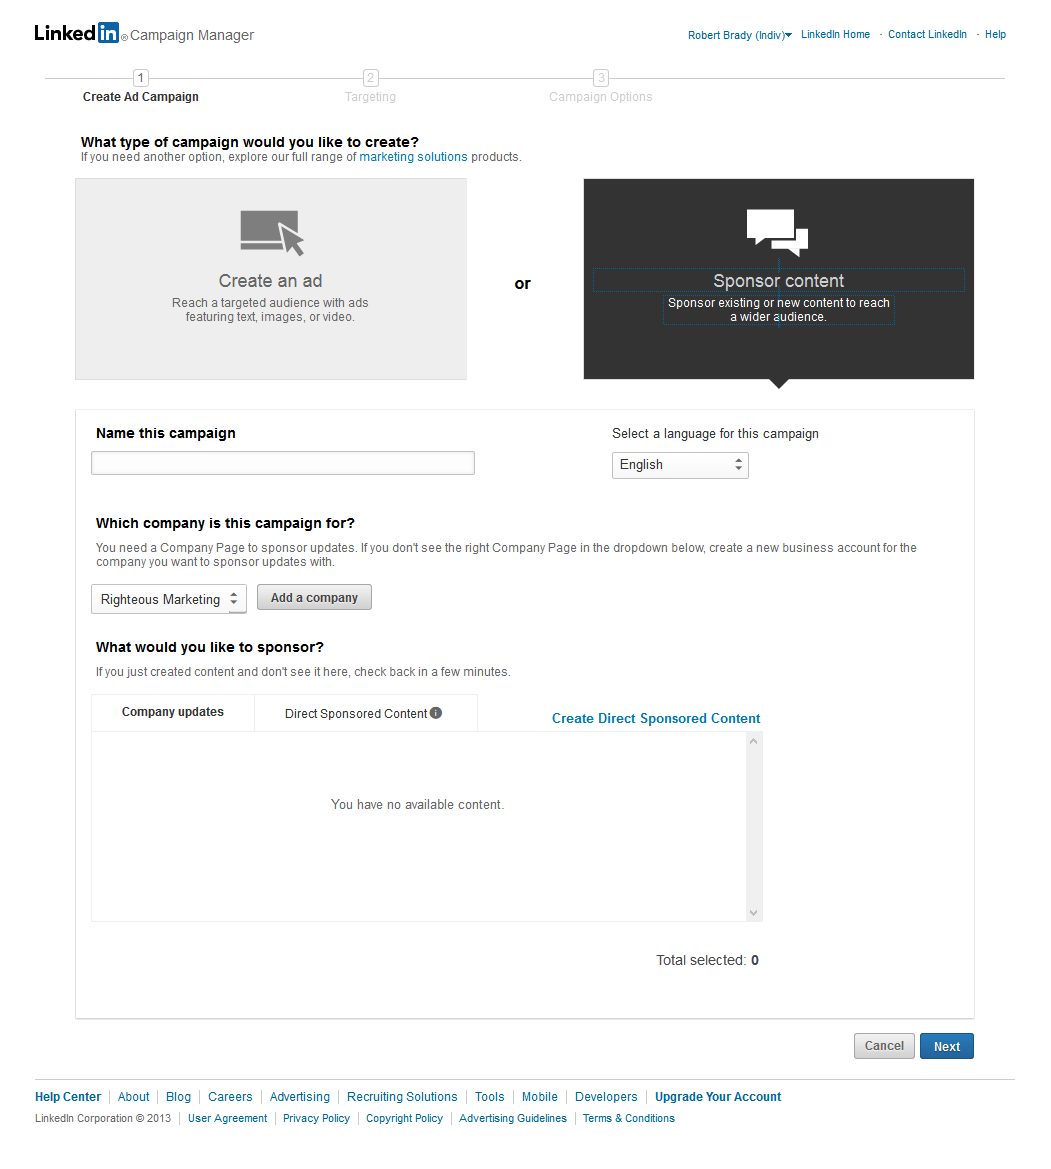
However, you’ll notice the option to “Create Direct Sponsored Content” as a blue link. This is my recommended route because it allows you to create a “dark post” that doesn’t actually go to your company page but will appear like it was. This way you can vary copy for different audiences and use specific tracking URLs. Here is what it will look like:

You write a brief description and paste in the link. The content will pull automatically into the box, you pick an image (I don’t recommend leaving out an image, EVER), and click Save. Notice that it will not be published to the company page or member feeds.
Targeting
Now we get to the best part; targeting. Below is a full view of the targeting options you have for each campaign:
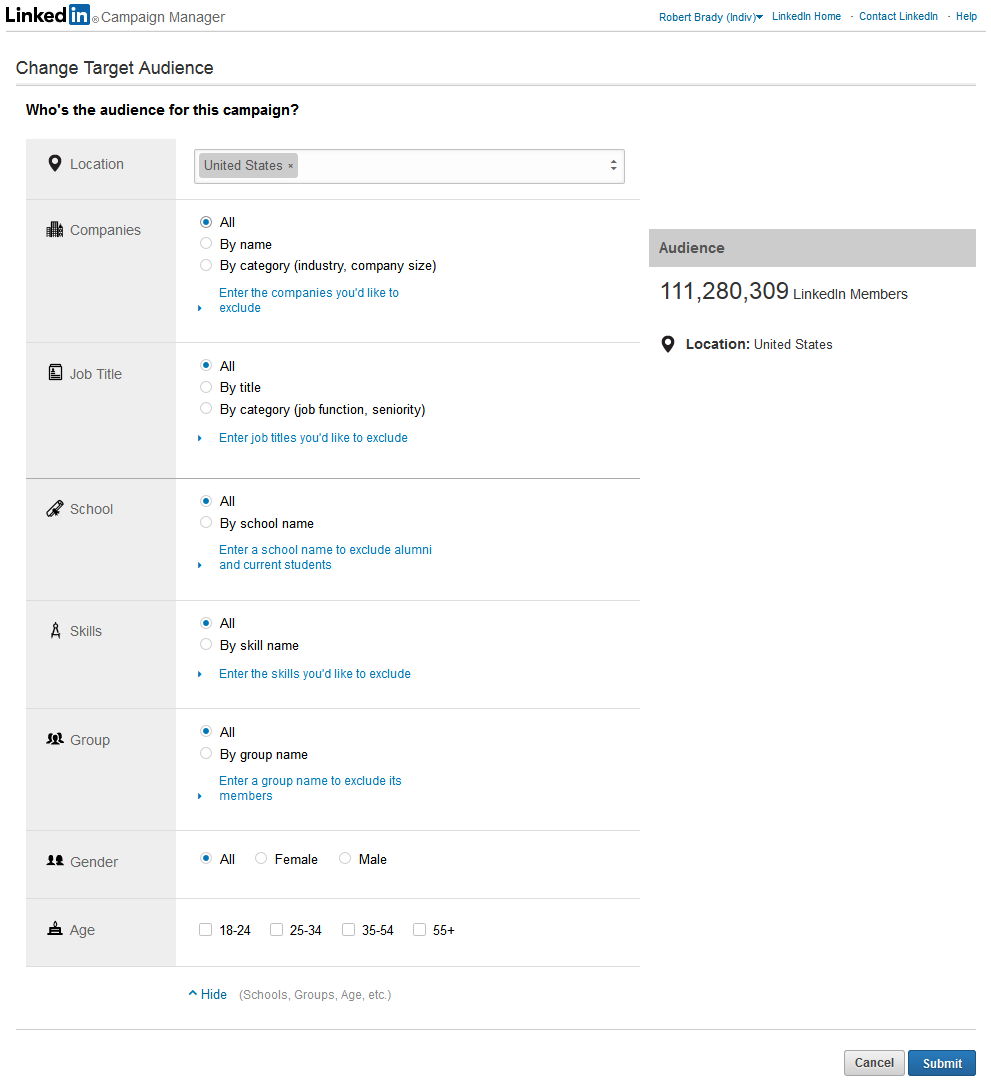
Each area has a few nuances:
- Location – The only required targeting option. If you’re a geography nerd this will annoy you because North America only includes the US and Canada and various other oddities. Notice that you have Continent/Region, Country, State, and City for most of the world.
- Companies – You can target specifically by company name, by the predefined industry targeting, or by company size. Also note that you can target based on exclusions (a good trick to get bigger audiences if you’ve gotten too specific.)
- School – You can target current students or alumni of specific schools.
- Skills – These are based on the endorsements that LinkedIn users give one another, so they’re one of the looser targeting methods, but with appropriate layering you can make them produce.
- Groups – Target only members of certain groups on LinkedIn. Great for reaching niche audiences.
- Gender
- Age
Best practice is to layer targeting to get the right message to the right people. As you create your targeting you’ll notice the Audience estimator on the right side shows the estimated size of the audience. Keep in mind that you need at least 1000 people for a campaign to work.
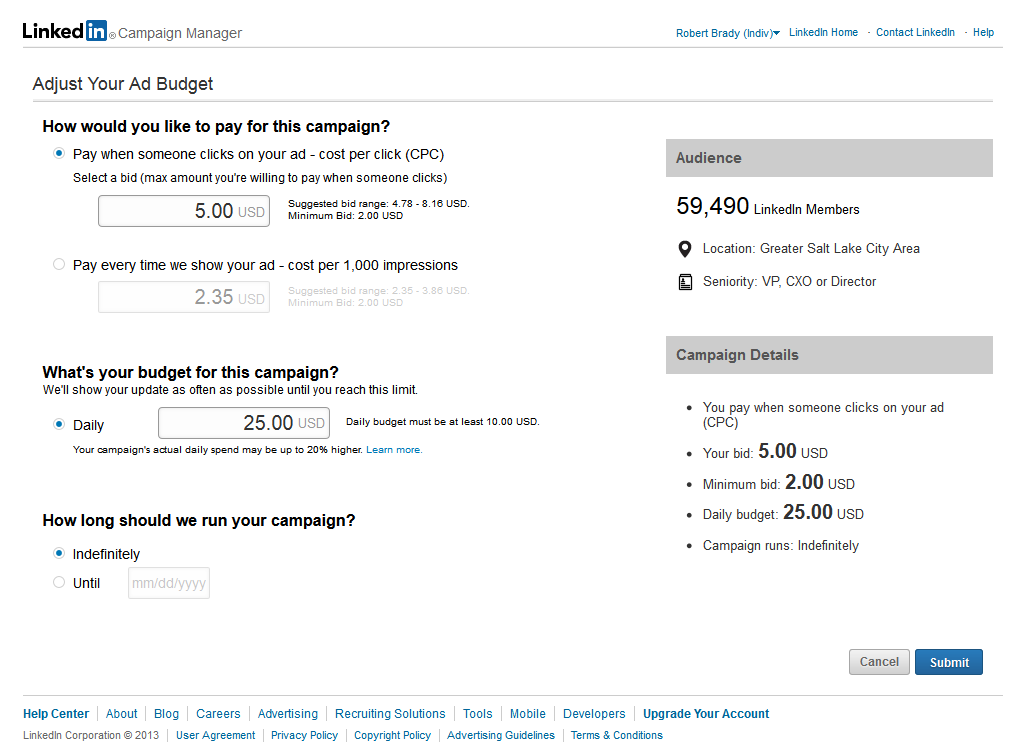
Pricing
The last step is to set your bid & budget. Bids can be made on a CPC basis (my recommendation), with the minimum bid being at least $2.00 and they will give you a recommended range. I recommend over-bidding initially to get a good CTR and then bring it down later. You also have the option of bidding on a CPM basis, but unless you have some amazing copy that you know gets good CTR this will likely cost you a fortune and not deliver what you expect. You can also set a daily budget and an end date for your campaign if needed. Here’s what it looks like:
Once you click Submit your ads get sent off for editorial approval. Once they pass muster you’ll be up and running with your first LinkedIn campaign!
