
Display ad inventory includes great sites and plenty of terrible ones. As a result, advertisers continue to push for greater control over where their ads show. Avoiding ads on low quality and offensive sites it more important than ever.
The good news is that negative placements will assist us in this endeavor. The bad news is that like many routine changes, it is a drudge of a task to implement at large numbers. In AdWords we can take advantage of AdWords scripts to handle the bulk of this work.
In this article, we’ll move from concept to an automated solution and cover a few opportunities for improving the script. This won’t be a perfect solution for every case but you will come away with a clear path to implementing this script or something similar in your own accounts.
Background Scenario
In this example, our client has an internal list of negative placements. Ads must not show on these URLs. Every week a new list is created and exported to a Google Sheet. Any changes, additions or removals, must be implemented in the active AdWords display campaigns.
Breaking Down The Requirements
We can break the problem into simpler steps for writing the script.
We have,
- A Google Sheet with the desired negative placements
We need,
- A place to put the new negative placemements
- A way to keep the placements in the account up to date
Using a Google sheet means we’ll used the SpreadSheetApp functionality in the script.
Our best bet for negatives is a shared list. We can use this list for all campaigns and avoid updating each campaign individually.
Keeping the placements up to date means we need a process for adding new ones and removing old ones.
Now that we’ve broken down the components into simple steps, we can start building the script.
Interacting With The Spreadsheet
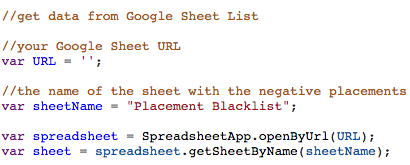
Our first step is to pull the list from the spreadsheet. Using the built-in functionality, we can access the sheet by a URL and then extract the necessary columns.
In the code below we open the spreadsheet by the URL, select the necessary sheet, select the range. Finally, we use getValues() to extract the values from the selected range. It may sound complicated but if you take a step back, you will realize that we completely the exact same steps as we would manually.
Selecting the negative list
Now that we have data we need to select the proper list. We’ll assume we’ve already built a list, named Exclusion Master List.
Selecting the list is simple, we’ll search for it by name in excludedPlacementList. Once we have it, we can store it for later use.

Replacing The Old List
We don’t know which URLs changed and new ones are not always added at the end of the file. This means we need to find any differences between the current list in the account and the new list in the Google Sheet.
The client in particular had tens of thousands of URLs. Trying to search for matches became time consuming and I did not want to the script to time out. As a result we’ll brute force this section.
Rather than trying to match up the list, we’ll wipe all the URLs and replace them with the new list.
We’ll pass our negative list into a function, access the excluded placements in that list. While there are placements left, we will remove them.
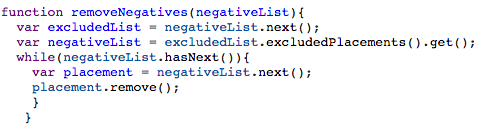
Note that we are storing this is a function to make our lives easier in the future. The function isn’t necessary but makes the code more flexible and manageable.
Adding The New Placements
We are now in the last phase! We selected all our negative placements, we’ve cleared the old list, and we are ready to upload the new placements.
Similar to the list wipe, we’ll select the same Exclusion Master List. Storing it as a variable means we can access it by name again.
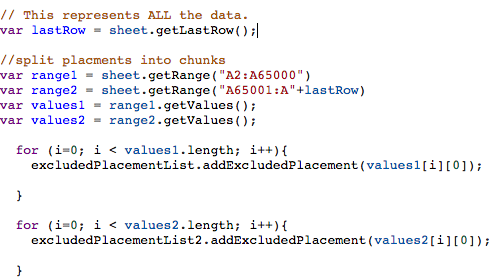
You can only add the individual placements one by one. There is no mass copy and paste. We’ll use a loop to select each placement in our list and add it. We don’t have a handy hasNext() for the pulled placements so we will use a for loop will start at the beginning and cycle through each placement until it gets to the end.

Are We Done And What Is Next?
We are pretty much done at this point. We simply need to run the script on a schedule and it will routinely wipe and add negatives as needed.
To recap we wrote a script to,
- Access a Google Sheet with our negative placements
- Access a specific list
- Remove old negatives from the list
- Add new negatives to the list
All simple enough tasks but with enough switching around to make manually updating these a pain.
If we wanted to take the script a bit further we could check each campaign to see if it had the list applied. If a list was not applied to a campaign, the script would apply the list. This would keep everything in line and ensure targeting was always consistent. This is goes beyond the quick and dirty approach we took in this article but Here’s an AdWords script to apply shared campaign negative lists everywhere from Dan Gilbert of Brainlabs is a great resource.
You could also expand the script to handle cleaning and updating multiple lists. This could be due to limits, lists can only hold 65,000 negatives, or you’d like to separate lists by type of placement. All you’d need to do is duplicate some of the same processes per list.
Conclusion
We’ve covered a lot of material today, especially is you are inexperienced with scripts. If you ever need additional inspiration or examples you can find a plethora on the the Google Developer’s Resource page with, code samples, reference materials for every object and function, and fully built solutions.
