This periodical series is designed to help provide you with a better understanding of the true potential behind Microsoft adCenter’s paid search interface. I’ve found that literature pertaining to this subject is sparse, so I intend to contribute to the lack thereof.
Overview
Back when Bing and Yahoo announced that they were going to join forces, one of their endeavors sought to improve upon the conversion tracking abilities within the adCenter interface. Similar to goals and funnels in Google Analytics, adCenter wanted to provide a feature that could help you derive better insights into your campaigns’ conversion process. In this post, I will provide a general overview of adCenter’s Campaign Analytics and walk you through the setup process. But first, I should lay some groundwork.
For those of you that need a refresher, adCenter defines a conversion as “the completion of an action initiated by a customer as a result of clicking an ad.” You might think of these as purchases or form submissions. This optional performance metric provides deeper insight into your paid search campaigns and allows you to analyze and optimize for improved performance.
Tracking Visitor Activity
Now that everyone is on the same page, let’s begin taking a look at adCenter’s Campaign Analytics function. Essentially, this tool enables you to define and track site-visitor activity leading to a conversion. You might think of these as checkpoints that can show you which paths your visitors are taking, in order to reach the finish line (a conversion).
You can define up to six goals for your account, and then use each goal to analyze conversions from any of your campaigns. For each goal, you can also include up to five additional steps that lead to the conversion. These are comparable to the goal and funnel features in Google Analytics. Your goals can include any one of the following steps:
- Conversion Step: Tracks a transaction that a customer completes on your website. A conversion step is required for your goal.
- Land Step: Tracks a visit to the site landing page that you want to lead to a conversion. Your goal can only have one land step.
- Browse Step(s): Tracks when a visitor browses to a webpage with general information such as a list of products. Each goal can include up to five browse steps.
- Prospect Step(s): Tracks when a site visitor browses to a webpage with specific information about the product or service. A goal can have as many as five prospect steps.
Aside from indicating which goals and steps are important to your conversion process, you also have the ability to specify the number of days prior to a conversion that you would like to track a visitor’s interaction with the pages on your site. This is a nice feature for those of you looking to do some reconnaissance of your customers from early stages in the buying cycle.
Tracking Revenue & Costs
The Campaign Analytics tool also comes equipped with revenue and additional cost tracking features. You can choose to associate either a concrete or variable value to each of your conversions. This will ultimately depend on the variety of products and services you offer. You also have the ability to track additional costs associated with your conversions as well. These would include things like taxes and shipping fees.
Setup
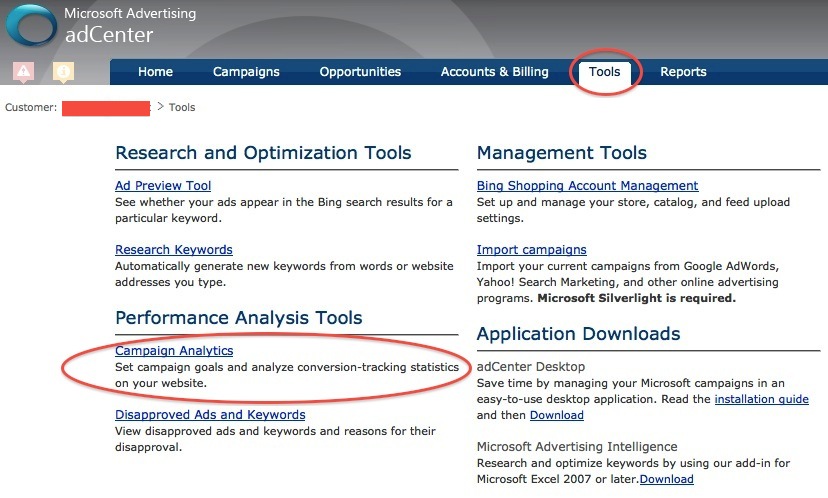
In order to set up adCenter’s Campaign Analytics, you will want to login to your account and navigate to the Tools tab.
Once you’ve arrived at the Tools tab, click on the Campaign Analytics link under the list of performance analysis tools.
Next to Tracking Status, click Edit. Your screen should look like the one above. In order to track visitor activity, you will want to unselect the box that says Limit to individual campaign conversions only.
If you select Limit to individual campaign conversions only, you’ll track conversions only, and you must manually enable conversion tracking for each campaign on that campaign’s settings page.
Basically, what that means is that your conversion code will not include the necessary parameters for tracking visitor activities. You should uncheck this box if you’re trying to track those additional activities aside from conversions. After you have done this, click Create Goal.
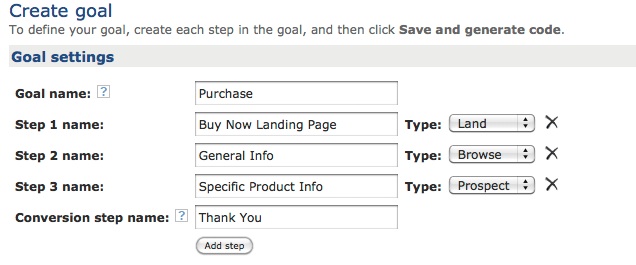
On the Create Goal page, you need to enter descriptors for your Goal, Steps, and Conversion Step.
- A goal is an action you are hoping a visitor will take, such as the purchase of a product.
- Additional steps (optional) can be added as checkpoints to determine the pathway of pages your customers visits before converting on your site. For each step, you must also assign a type that indicates what type of page that step is assigned to. Refer to the “Tracking User Activity Section” above for clarification on which type you should choose.
- A conversion step is the final action performed by a user that results in the completion of the goal.
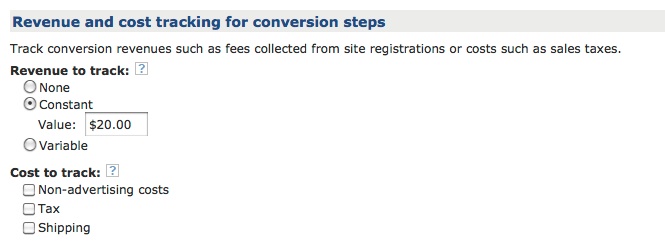
Once your Goals, Steps, and Conversion Steps have been set, you can also choose to track your campaign’s revenue and additional costs. If you’re conversion has a concrete value, include that value and select Constant. If the value of your conversions is not the same each time, select Variable. Furthermore, if you would like to track any of the additional costs, simply select the boxes you want to include under the Cost to track heading.
Next, you will want to indicate the number of days prior to a conversion that you would like to track visitor activity, under the Conversion period heading. This is a great way to see how your visitors are interacting with your site before becoming customers. Then, click Save and generate code.
Once your conversion code has been generated, you need to copy and paste the JavaScript code snippet on each of the respective pages you would like to track. It is very important to make sure and paste the snippet between the <body> and </body> tags for proper functionality. For more on the setup process, check out the adCenter Support page.
There, you’ve done it! Be sure to keep in mind that after you turn on Campaign Analytics, you can start generating reports after approximately four hours. From there, you should have a nice set of additional data that you can use to your campaign’s advantage.
Understanding how your customers interact with your site can be valuable information, and as some of you may not have known, this feature is not exclusive to Google alone. There are many things we still have to learn (myself included) about adCenter, and having a better understanding can certainly put you at an advantage. It is my hope that you will have taken something useful from this post, as well as future posts, to gain better insight into Microsoft adCenter. If you’ve had previous success with the Campaign Analytics tool, or simply want to give me some feedback, I would welcome your comments below!


