01/22/2020
Want to know how to st up Google Ads?
Diving into the world of PPC Advertising can be intimidating. As PPC Hero bloggers we know this and have put together a helpful, “Beginners Guide to Setting Up a Google Ads Account.” The Google platform is typically the first engine we recommend testing when new to PPC advertising.
The guide is designed to not only walk you through set up, but ensure you have the necessary assets in place to run successful campaigns. Once your credentials are established the contents cover account set up, campaign structures and settings, payment options, and tracking. Beyond the basic set up we review keyword research and creative tips and tricks.
Are you set up to run successful campaigns?
As mentioned above there are a few key elements you will need to consider in order to be successful on the Google Ads platform. Review the checklist below to ensure you have thought through these key elements.
- Website designed to easily lead users to your end conversion
- PPC strategy and defined goals. A great resource to help you along in this area can is How should you formulate your PPC Strategy by Diane Anselmo
- Set aside a budget and timeline for the test. We recommend at minimum $500 per month for 3 months.
Account Set up Basics
In order to sign up to advertise on Google Ads you will need to create a Google Account. Then simply head over to ads.google.com and sign in. Once signed in you will be prompted with the question of “What’s your main advertising goal?” For the sake of this article and setting up a Google Ads account, select “Switch to Expert Mode” at the bottom.
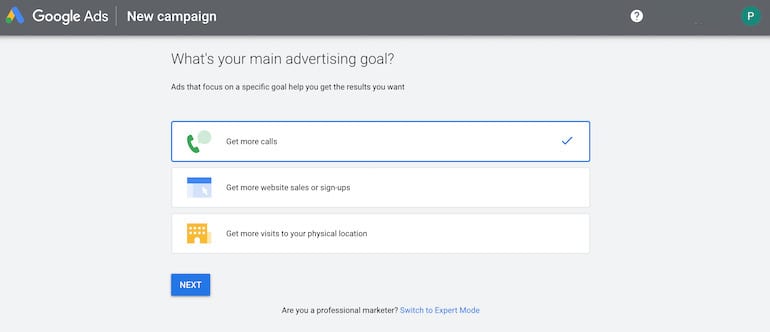
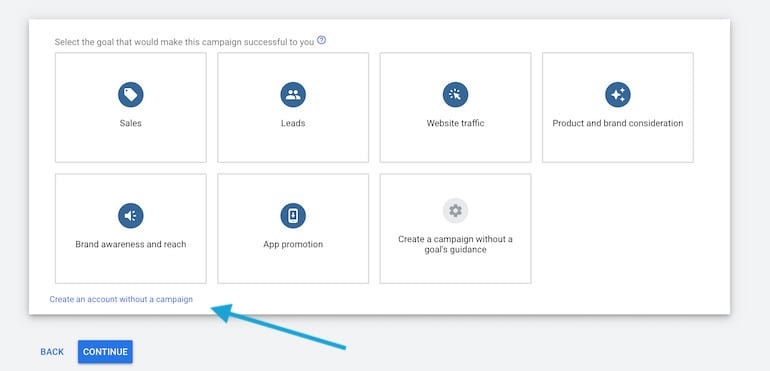
From that point, you’ll be prompted to create a campaign. You certainly can create a campaign, however, I recommend skipping that step until you are familiar with the interface.
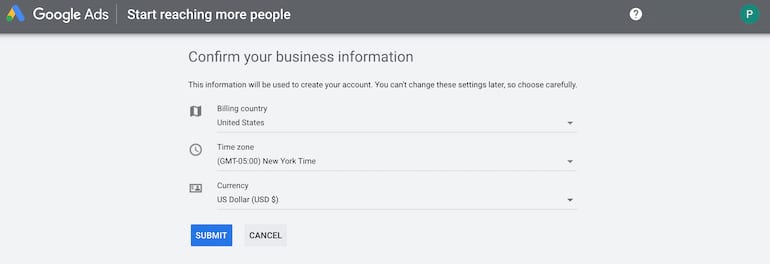
Next you will be prompted to confirm your business information. It’s important that this information is correct because you can not change this in the future.
From that point, you can explore your new account!
One thing to note is that the old interface gave us a few key items to consider, such as;
- Choosing your budget
- Creating your ads
- Selecting keywords to match your ads to potential customers
- Entering your billing information
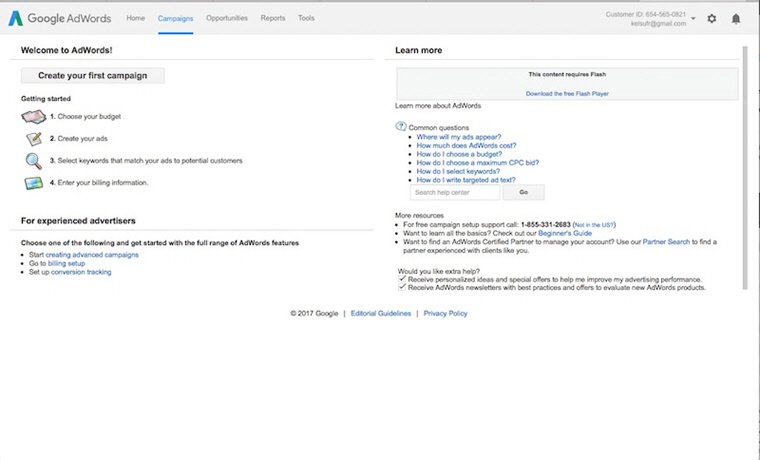
However, the new UI, sends you straight to the main account page. While you still want to complete all of the above, it’s not prompted in the same format.
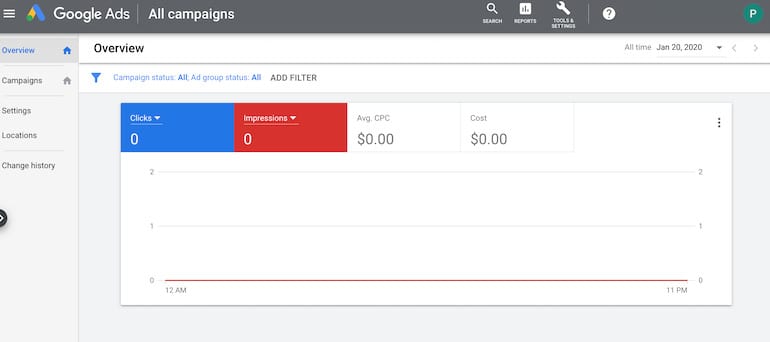
Prior to creating your first campaign, there will be some legwork required in order to avoid having to backtrack in the setup process. The first two areas recommended to tackle are keyword selection followed by the account structure.
Creating An Initial PPC Keyword List
Keyword research is the foundation of a pay-per-click campaign.
Beginners tip: Keywords are the words or phrases your customers would use when searching for your product or service. When a customer types in a keyword you are bidding for they will be shown an ad.
There are a few key areas that are helpful as you begin to build out your keyword portfolio:
- Company website – A website is typically peppered with core words and phrases that describe your business. Reviewing the website layout will also help identify any major themes and can help drive the structure of your campaigns.
- Keyword research tools – We recommend leveraging these tools to help you expand upon the core list you have pulled from the website. Most tools will also give you insight into volume, competition, as well as recommend starting bid. These tools will also help you identify keyword variations and synonyms. There are a ton of tools available to perform research. A comprehensive list of research tools can be found in our PPC Hero post, “You’re bidding on all the wrong keywords” by Jacob Baadsgaard.
- Think like your customer – Take a step back and put yourself in the customer’s shoes. What would someone who’s looking for your product or service type into a search engines. Often times you will find people searching a problem you have a solution to.
- Don’t forget brand terms – Seems obvious enough but there is value in showing up in both paid and organic on your branded keywords.
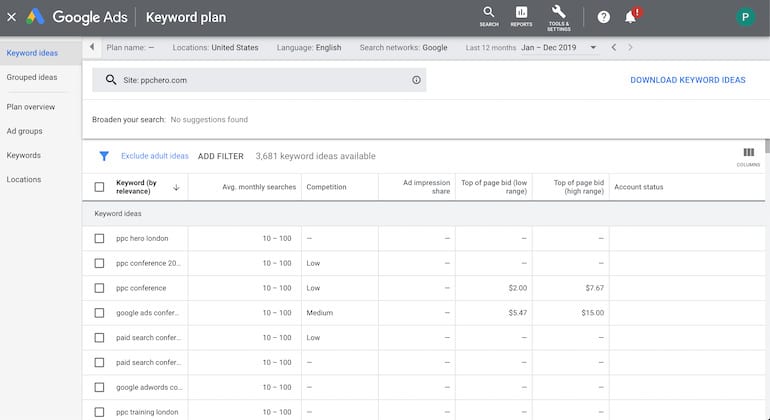
Keyword research is an on-going process, but starting off with a strong list of initial keywords will start you on the path to PPC success.
Campaign Structure Basics & Best Practices
Organization is key when developing a structure for your campaigns. Proper organization can Account structure and organization will impact your quality score and influence how your account performs.
Campaigns and Ad Group Best Practices
Campaigns should be segmented by higher-level ideas so that you can drill down into more tightly themed ad groups and keywords. Consider the following ways to segment your campaigns:
- Based on the products and services you offer
- Based on geographical location
- Based on performance and bidding
- Based on brand names vs. generic names
- Based on seasonality of your service or product
- Based on keyword match types (you can also segment this way on an ad group level too.)
The best guideline to follow when working through a structure is to ensure ad groups are relevant to campaigns. Having a campaign about handbags and associating ad groups focused on shoes and lip-gloss will make it difficult to track the performance of handbags from a top-level. It can also interfere with delivering the best ad copy and landing page experience to your consumers.
Example:
Campaign: Handbag_Brands Handbag_Types
Ad Group: Handbag_Gucci Handbag_Clutch
Ad Group: Handbag_Channel Handbag_Sling
Ad Group: Handbag_Kate Spade Handbag_Boho
The ad and landing page experience that is ultimately served to a searcher is structured within your ad groups. The goal is to create a structure where campaigns, ad groups, keywords and ads all relevant to each other within your structure.
Ad Creation & Landing Page Mapping
One final consideration before jumping into the campaign creation and focusing on settings is writing ads and mapping landing pages per ad group. The best keyword portfolio and campaign structure can fall flat without the proper ad and landing page experience. Relevant ads and landing pages help you achieve a click-through rate, cost per lead and ROI, however, there’s something even larger at play with great ad text; your Quality Score depends on it.
The Google Ads system issues a keyword-level Quality Score to each of your keywords (calculated according to your exact matches) and click-through rate is one of the biggest players in the calculation. A high Quality Score ultimately helps you achieve a higher position on the page and lower overall cost per clicks, which means your budget can stretch a bit further for the same amount of clicks.
Before you dive headfirst into ad writing, take a step back and think about the audience you want to appeal to. There are a lot of aspects surrounding a company that should help you in writing your ad text.
- Brand: Borrow from other marketing areas and the landing pages to keep the message consistent.
- Products/ Services: The language in your ad text should reflect what product or service you can provide to the customer and any brand advantages
- Goal: Outline the action you want your audience to take on the landing page. Example: Buy now, sign up today, learn more.
The Expanded Text Ad
You have 300 potentially visible characters (3 headlines, 2 descriptions, and URL path) to encourage a user click on your ad.
Character Limits
- Headline 1: 30
- Headline 2: 30
- Headline 3: 30
- Description 1: 90
- Description 2: 90
- Path 1: 15
- Path 2: 15

Beginner Tip: The excel LEN function will count the characters in each of your lines when writing ad copy.
Outside of expanded text ads, the newest Google Ads text ad format is called Responsive Search Ads. You can find more information on set-up and best practices in this article by Hanapin’s own, Mark Ferree.
Ad Extensions
Beyond the ad itself, advertisers are able to take advantage of ad extensions (appear below the ad in the example above). The full list of available extensions can be found on the Google Ads Support site. Our favorites include:
- Sitelink – Link customers directly to areas of your website
- Callout – Text based links to highlight benefits
- Location – Encourages people to visit a brick and mortar business
- Call – Allows people to call directly from your ad
- Price – Shows the price of products or services
- Promotion Extensions – Highlight promotions on your site.
Landing Page Mapping
As you begin to write ads attempt to send a customer on a direct path to conversion. If a customer has searched for Gucci Handbags, the goal would be to send them to a page on your site that has all the Gucci bags you offer. These days customers have limited patience and will head back to the engine to search until they reach their desired outcome in one click.
At this point the prep work to dive into the interface and start setting up your first campaign is complete. You should have a list of keywords organized into campaigns and ad groups. Each ad group should have a few ad variations prepared and be mapped to landing pages.
Campaign Creation & Settings
At this point you are back to beginning. Sign into ads.google.com with your resources in hand and navigate to “Campaign” on the left-hand side and then select “+New Campaign”. Upon click you will arrive at a page that promopts you to select your goal. Feel free to choose your goal or “Create a campaign without a goal’s guidance”. If the later is selected, you will move to the next step that includes several settings.
Type – The Google network allows you to select from a run on a variety of different campaign options.
- Search Network with Display Select
- Search Network Only
- Display Network Only
- Shopping
- Video
- Universal App Campaign
The most common setting for someone in a testing phase would be Search Network Only.
Network – Google offers three settings to be chosen from in this view.
- Google Search Network
- Google Search Network including search partners
- Google Display Network
The most common setting for someone in a testing phase would be Search Network Only. Depending on your budget and desired impressions you may want to include search partners. The search partners setting will open your campaign up to more volume but can be less qualified than traffic coming directly from the Google search network.
Devices – The default is set to show to all devices on the network. To opt out of serving ads by device you will have to use bid modifiers. A great reference is our PPC Hero blog why you need to be applying negative bid modifiers by Stephanie White.
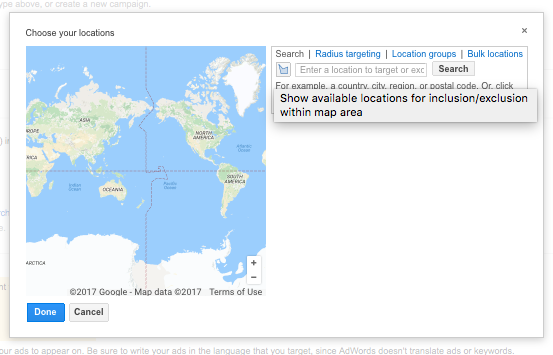
Locations/ Languages – This setting will allow you to select the geographic region where you want your ads to show. If you are a local business you may want to select by city, region or radius targeting. Below location setting you can select the most appropriate language for your audience.
Bid Strategy – This is an important setting. It is important to think through your daily budget allotment. If set too high you could blow through an entire months budget very quickly. To begin set this to something realistic for each campaign and then modify based on actual spend levels as you gain learnings.
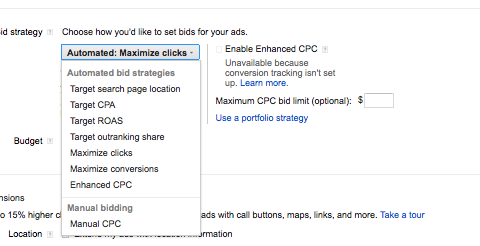
Within this setting you also have the capability to set a bid strategy. Google Ads offers great explanations of how automated bid strategies can assist with performance on their support site. Generally we recommend running initially with a manual bid and setting a cost per click you are comfortable paying for each campaign.
Finalizing Your New Google Ads Account
When you select the create new campaign feature Google takes you through four steps to set up your account. Since you have your research done and all of your settings are ready, this will be fairly simple.
- Step One: Campaign Creation and Settings (complete)
- Step Two: Ad Group & Keyword Creation (complete)
- Step Three: Create your first Ad (complete)
- Step Four: Finish and Save (complete)
At this point you should be prompted to add in your billing information as a final step before your ads will start triggering. If you are not prompted visit the gear at the top right hand side of the Google Ads interface and select billing & payments. Unless you have made prior arrangements with Google to be invoiced the default payment method is automatic payments charged to a credit card after costs start to accrue every thirty days or when a billing threshold is met.
After Set Up Check Advanced Settings
Once your account set up is complete and basic campaign settings have been implemented you will have the options to modify advanced campaign settings. At the setup phase you may want to adjust your ad delivery option. Initially, we prefer to set our ads to rotate evenly. This method allows for more control over ad copy tests and allows your campaign to aggregate data before letting machine learning take over.

Last Step Consider Tracking
Conversion tracking through Google Ads is free and allows you to use many of the “smart” features now available such as, smart bidding and optimizing towards conversions. It allows you to track a variety of different metrics including:
- Website actions
- Phone calls
- App installs and in app actions
- Import from offline conversion metric
While it works a bit differently for each type of conversion you must implement the Google Ads conversion tracking tag into the code of your website. For full implementation directions visit the Google Ads support site.
![]()
Another recommended tracking option in Google Ads is to link your analytics account. Full directions for how to link accounts can be found in the help section of the Analytics site.
Set Up for Initial Success
The above steps are the basics of getting an Google Ads account launched. Beyond set up spend time reviewing stats, optimizing your account. One of the largest misconceptions of pay per click advertising is that you can set it up and forget it. Our PPC blog is a great resource to use to continue the process of your campaigns.
—-
Guide updated by Shannon Macklin (prior post date: 06/14/17)


