Conversion tracking is essential for PPC account management, but setting up Google conversion code in AdWords can be confusing. In this how-to video, we show you how to set up conversion tracking in Google Adwords, and then how to make sure it’s up and running!
Transcript:
Hello and welcome to PPC Hero’s video tutorials. Today we’re going to be talking about how to set up conversion tracking in Google AdWords. So, let’s get started.
The first thing you’re going to want to do is log into your Google AdWords account. Now, you don’t need to have any of your campaigns running to set up conversion tracking, but you do need to have the account set up. So we’re going to go to our Reporting and Tools tab, and click on Conversions from the drop-down menu. We’ll then go into creating a new conversion. There is a new conversion button with a blue plus sign: press that, and it will ask you to name a new conversion. You’re going to want to name this as close to the conversion you want as possible; so here you can see we have a submit a contact form, which would be a good conversion name. However, for the purpose of this video, I’m going to call it Test 3, and choose it’s tracking purpose as other. I will press “Save and Continue”, and Google is going to take me to the Code tab.
In the code tab, it’s going to first ask me what page security level we have, and there are two choices: HTTP, and HTTPS. HTTPS means that you have SSL security on your page. A lot of sites that are set up to take money have this on their sites, so e-Commerce especially. Today, however, we’re working with a website that does not take money from the website, so we will choose HTTP. You can also put in revenue for your conversion here. So let’s say you have research that shows that every time you get a proposal submitted, you usually get about $100. So that would be a good amount to put in here, so you can better learn to prioritize and plan your marketing schemes. So we’re not going to put that in today, but do keep it in mind.
The next thing Google is going to offer…ask you to do is to set up your tracking indicator settings. This lets people know that you and Google are tracking their information of when they go online to make a conversion. Now, Google highly suggests that you do this, and they even provide you with two different with small text boxes with different color options. However, if you have the viewer tracking information in your privacy policy you do not need to do this, as long as it is clearly marked in that privacy policy, so we are going to click None because the page we’re working with has this in their privacy policy. I’m going to press save and get the code now, and Google has generated it.
Now here’s the part that a lot of people get a little worried about, about where to put the conversion tracking code. Now I’ll show you: it’s not too hard. I have pulled up a text file of the code for my conversion page, landing page, here. And you can see that it looks pretty daunting, especially for people who are not developers. However, all I am going to need to do is to put the tracking code at the bottom, between my body tags. So, I am going to copy the code, go into my text editor; you can see that we have the body text all the way to down here. I’m going to want to go to the bottom, to where I can see the </body>. This is not the footer, mind you, but bottom of the page. I am going to copy and save my conversion code into the page here, and then upload it onto the website and the conversion tracking will be in.
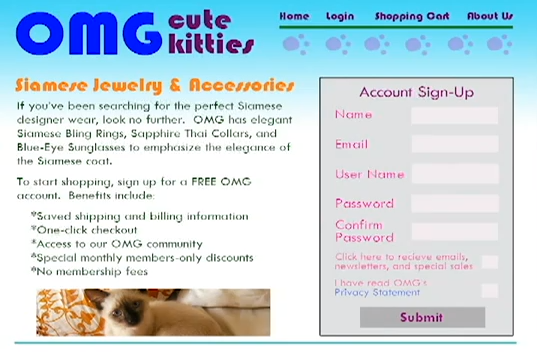
The one tricky part that you really want to watch out for, is that you are going to want to put this code not on the page with the conversion button, but on the page someone reaches after they click that conversion button. So let me show you an example. let’s say this is our landing page: I got here after clicking on an ad…after putting in a search query and then clicking on an ad. I have now entered all my information and I am going to request a proposal. So this is the page where we do not want the tracking code to be on. So I click on Request A Proposal, and I am taken to this page…this page that thanks me for doing my conversion. This is the page where the conversion code will be, where you want to put it. It’s actually a fairly simple concept, conversion coding – conversion tracking. It just says that there are certain pages that can only be reached once you’ve made a conversion – usually an order confirmation page, or a thank you page – and that is where you want your conversion tracking to go.
So, now that we have the conversion tracking implemented, there are a few ways to check that it is working. Let’s walk through these really quickly.
Let’s say that I’ve already uploaded the conversion tracking, as this page already has. One way to check would be to view the page source. So I’m going to double-click on the page, and scroll down to View Page Source. It will take me to a page that shows all the coding in HTML format. I will scroll down to the bottom, to see whether or not I can see the Google tracking code. And here it is right here. You can see it says Google Code for Submit Contact Form Conversion Page, which is what I named that code, and it is above the < /body>, right where it should be. So that’s the easiest way to check to see if it’s in, and that’s the way the Google suggests.
Another way to check is to see if on your landing page you can see the tracking indicator here, if you opted to show that. And the final way is a little expensive for you, but you can go through, and click on your ad, and make a conversion – a test conversion. Make sure everyone who manages the account knows that this conversion is not from an outside source, but is from you. Then, after you log into Google AdWords, you will see the conversion from your ad right in the viewing window. Now, sometimes this takes 24 hours to propagate, so make sure that if you don’t see it, you give it enough time to register.
And that’s all it is for conversion tracking! Now, conversion tracking is exceptionally important when you are working with a PPC account, so I hope this tutorial has been helpful, and stay tuned for more tutorials from PPC Hero and Hanapin Marketing.
Thank you for tuning in to Hanapin Marketing’s video blog. For more information about the pay per click industry, check out our blog at PPCHero.com, and our Twitter account, @ppchero.
Check out other video tutorials from PPC Hero:
PPC Hero Video Blog 1: Optimizing Your Landing Page

PPC Hero Video Blog 3: The Contextual Targeting Tool


