

On May 13, Google Ads announced a new tool in the UI called Performance Planner. The Performance Planner helps advertisers optimize campaigns by suggesting an “ideal plan” by “spreading spend in the most effective way among campaigns in the plan.” Performance Planner is easy to use and certainly helpful, but it should be used with caution.
What Does Performance Planner Do?
Performance Planner tells you, the advertiser, how to change your bids and budget to maximize a specific metric across your campaigns.
Put another way, the output of the tool basically says,
“If you increase spend by $X, you can increase clicks/conversions/conv. value by X, [with an optional parameter>] while targeting X metric (usually CPA or ROAS).”
In the final recommended plan, advertisers can see how much they could spend to maximize 1 of 3 performance metrics: clicks, conversions, or conv. value.
While we can’t see all of the calculations happening on the back end of this tool, we know for sure that it takes the following into account:
- Existing Performance (current spend, conversions, conversion value, etc.)
- Past Performance (same dates one year ago if your account has that data)
- Billions of search queries (according to the announcement)
Then, as the Google announcement points out, Performance Planner simulates relevant ad auctions in aggregate, including variables like:
- Seasonality (see the full explanation below)
- Competitor Activity
- Landing Page

Finally, the tool forecasts for only the conversions that you’ve chosen to include in the “Conversions” column.
With the latest, quiet rollout of Conversion Action Sets, it’s unclear if the Performance Planner will make projections with campaign-specific conversions in mind or if the two features are not yet compatible. If they’re not compatible, you would simply build out multiple plans by grouping campaigns with the same conversion goals.
How do you use Performance Planner?
Requirements
Below are the requirements listed on the Google support page:
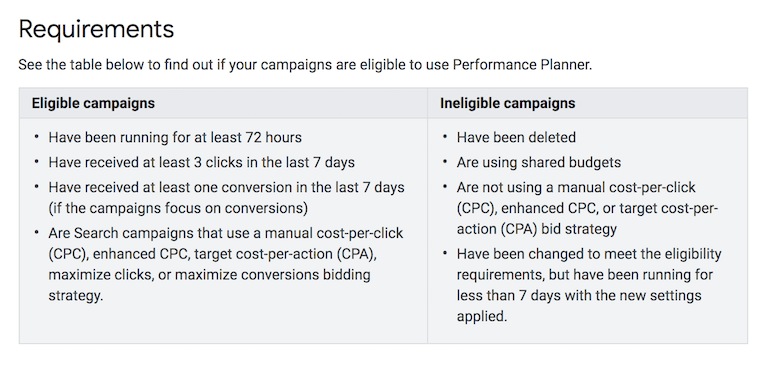
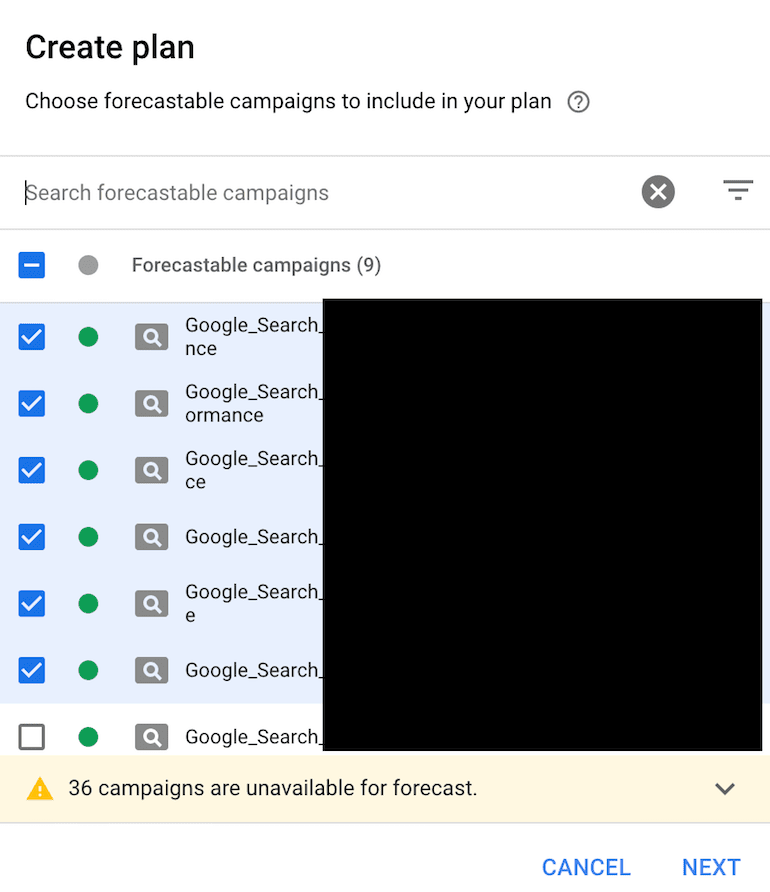
Don’t worry. You don’t have to check all of your campaigns by hand to see if they meet these requirements. When you’re creating your plan, the Performance Planner tells only lets you select “forecastable campaigns” for your plan.
Choose Your Goal
Now, it’s time to choose a date range and key metric.
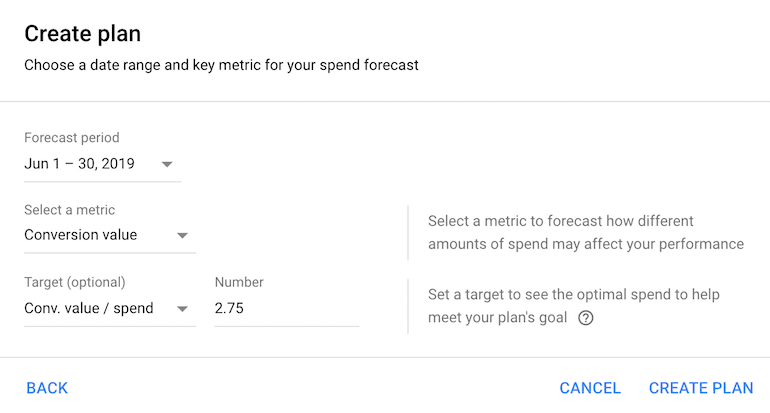
You can easily update the date ranges and key metric after Performance Planner produces the initial results, so there is no need to stress over the date or key metrics. Try multiple scenarios to get a better feel for how Google is calculating the growth opportunity!
Set Your KPI Parameter
You’ll notice in the screenshot above that the “Target” is optional. Most advertisers are going to include a target and I’d recommend you do the same. If you have a CPA or ROAS (conv. value/cost) goal for your paid search efforts, this is where you should include it. Otherwise, Google’s calculations will simply max out cost in order to max out the key metric, with no regard for how high your CPA is rising or how low your ROAS has become as a result.
Download Your Results
Performance Planner gives you two downloadable resources:
- Plan Summary (.csv) – An Excel file that lists your metric increases/decreases, by campaign, according to the Plan. (See below)
- Ads Editor file (.csv) – An Excel file that can be uploaded directly into Ads Editor to easily make the budget and bid changes included in your Plan.

Benefits of Performance Planner
There are several features of this tool that I think you’ll find helpful:
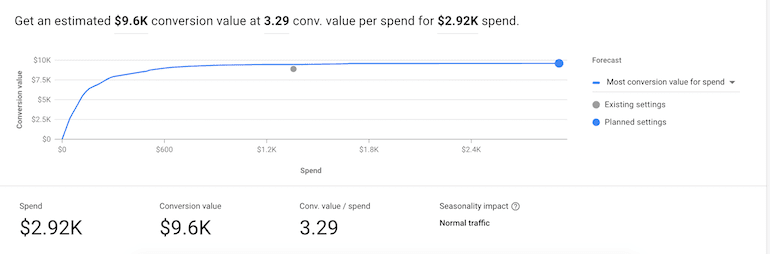
The summary graph – It’s clean, clear, and dynamic. In the example below, you’ll see that I am viewing the line chart as “Most conversion value for spend”. However, you can change that setting to “Highest Conv. Value / spend”.
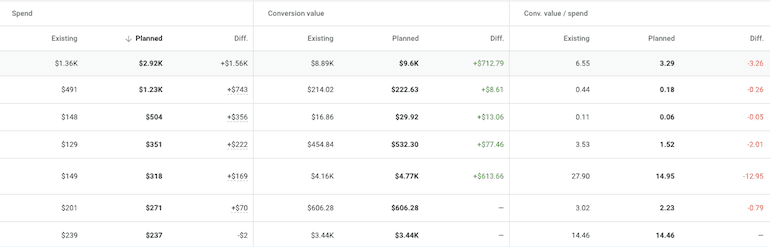
The before/after metric comparison table – The spend, key metric, and target metric are all segmented by “Existing” and “Planned” for each campaign. This is a great high-level view of where Google sees the potential for growth in your campaigns.
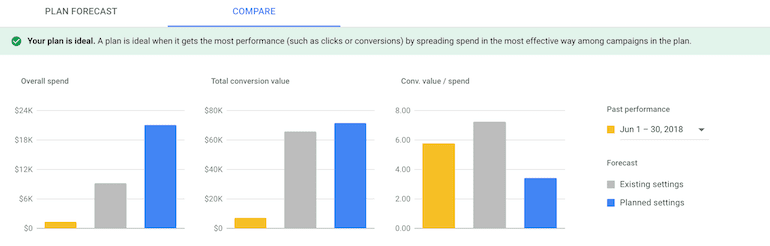
The Compare Tab – This feature allows you to see, in chart format, how your Plan projections stack up against your Existing settings and the past performance for the same time period. It’s visually appealing in that it’s simple and insightful. I can easily see, in this example, that my Plan spend is making a much larger jump than the Plan revenue which lowers the ROAS drastically (though ROAS is still above the target I set).
What to Watch Out For With Performance Planner
There are a couple of points to be cautious of when using Performance Planner:
- I didn’t think it was clear, in the support articles or the tool itself, that there would be paused keywords included in the downloadable Plan. However, that was the case in my example account.
- The following is stated clearly in the tool: “Your plan is ideal. A plan is ideal when it gets the most performance (such as clicks or conversions) by spreading spend in the most effective way among campaigns in the plan.” In the account where I tested Performance Planner, the final Plan was that I increase the cost by $1,500 for a $700 return. While this recommendation doesn’t prevent me from hitting my target ROAS for the Plan as a whole, most brands I’ve worked with wouldn’t want that kind of ROI on the additional spend. We could find more impactful ways, in Shopping/YouTube/Social to spend an additional $1,500 rather than pushing more into Search.
- Every brand has some nuance to it. Double check the Ad Editor upload sheet before using it. As I mentioned, I didn’t anticipate the upload sheet including paused keywords from my account nor did I want to enable those keywords, regardless of the projections.
To conclude, I’ll leave you with my overall thoughts:
- Definitely test the Performance Planner! It doesn’t automatically implement the changes that it recommends and it takes 5 minutes or less.
- You’ll either find that, directionally, there is a missed opportunity in your account OR that you’re allocating budget effectively already. Either way, make sure to share the results with your team after you’ve reviewed them for insights.
- Performance Planner isn’t a one-stop shop for your ENTIRE Google Ads account. If you’re running YT campaigns, Display, and/or Shopping, you’re still going to need your own tools to analyze your budget allocation.
A Few Additional Resources
If you’re happy with how much time Performance Planner saves your team from analyzing budgets but still looking for additional time-saving tips for Google Ads, check out this webinar, Time-Savers for Marketers in Google Ads.
It has been a busy week at Google! If you missed Google Marketing Live, you can catch up with The PPC Newsflash: Key Takeaways from Google Marketing Live. This won’t just be a live reading of the updates. Rather, we’ll focus on the resulting theories and strategies that will be critical for your future work in Google Ads.
