Starting PPC For eCommerce Sites: A Beginner’s Handbook Part 3 (Final)

You’ve come up with the perfect eCommerce site. Maybe you got in on a great wholesale deal for miniature furniture for dollhouses. Maybe you spin your own yarn out of your angora bunny’s hair and it’s selling like proverbial hot cakes. But, you seem to have reached your limit for growth through the marketing channels (or lack thereof) you’re already using. Someone or something told you about PPC, and you were interested enough to look into it. Well, this handbook is just for you. I made it for yooooou.
In Part 1, we covered advertising platforms and keyword research.
In Part 2, we covered account structure and budgeting.
In Part 3, our final part, we’ll cover campaign settings & ad testing!
Campaign Settings
When you go to upload your campaigns and ad groups, your campaign settings are going to be set to default settings. So, before setting anything live, you’ll want to review these.
- Locations and Languages
Pick the geographical locations you want your ad to show in. This may be limited by where you can ship to. If you aren’t limited by that, start with the countries you know you get a lot of orders for. If you are planning to target people who speak different languages, you can select those here as well. There are advanced location options that can be utilized for both targeting and exclusion methods for the Search Network.
- Networks
For Search, you can pick Google search, which is Google.com only, and the entire search network, which includes Google.com and all of their partner sites. I’d recommend beginning with all of the search network, as performance in my experience has been equal or better than Google.com with search partners. The Display network is a little more advanced than Search, and in my experience, more difficult to make profitable for eCommerce. For now, you should stick with Search Network only. Once you’ve got that to the point you feel very confident with your PPC skills, I’d suggest starting with remarketing on the Display Network. But, baby steps!
- Devices
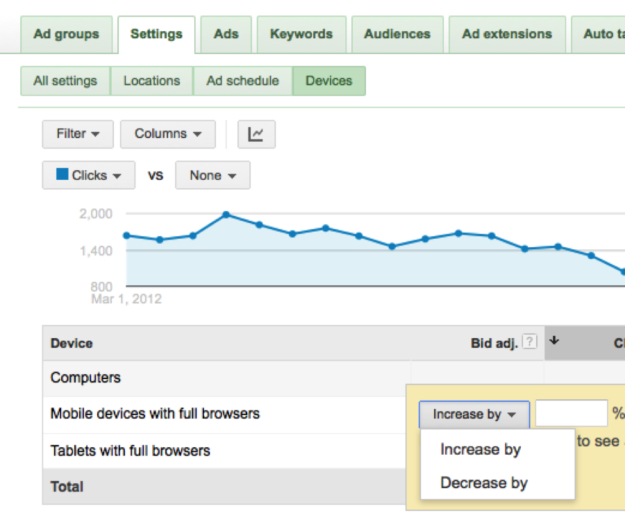
With Google’s new Enhanced Campaigns, you’ll be forced into advertising on tablets, but you still have an option with mobile. The first thing you want to do is see if your site works on mobile devices. If it does: awesome! You should try advertising on mobile. If not, you can set your % bid modifier for mobile at the campaign level to -100%. Here is a video blog to show you how to modify bids like this with Enhanced Campaigns.
Non enhanced campaigns (available now until June 2013)
Enhanced campaigns (available now and mandatory starting June 2013)
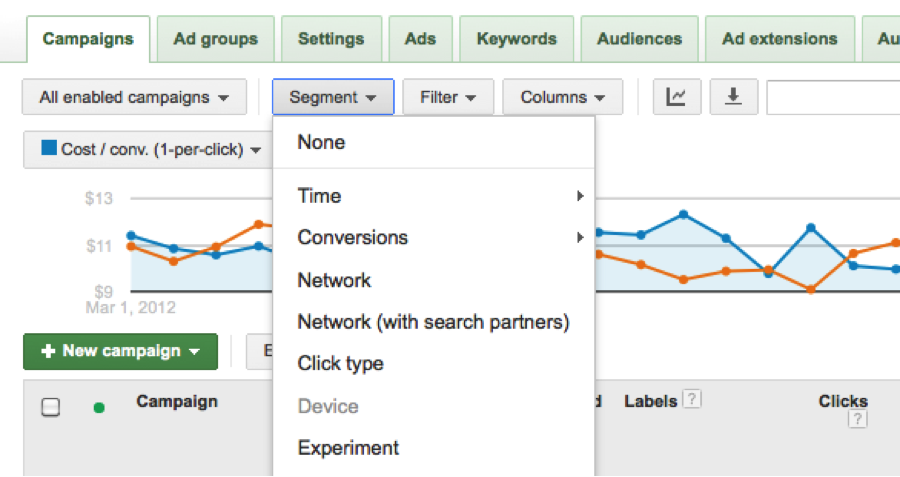
 In my experience with mobile, you normally want to bid down by a percentage. To be safe, start with 60% of your regular bids and change from there based on performance. You can segment to see device performance under the “segment” option in AdWords.
We also have a lot of articles about optimizing your site for mobile. So, if you find mobile works at least OK for you, or you want to make your site work on mobile: check this article out!
- Bidding Types
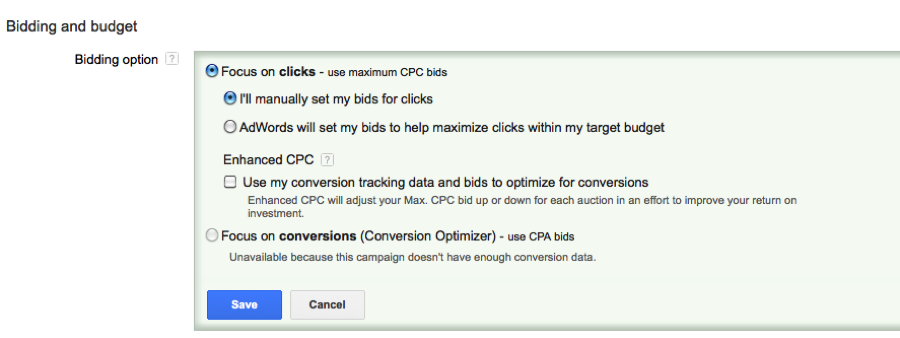
There are several different options when it comes to bidding. If you’re measuring ROI, then don’t even think about using CPM bidding, which is cost per one thousand impressions. This bidding is only for when you are just looking for traffic to your site and don’t care about sales so much, aka: not for eCommerce!
Another option is CPA bidding, which lets you set a maximum you’re willing to pay for each conversion. You aren’t able to use this until you’ve obtained at least 15 conversions a month for your campaign. I would strongly suggest you wait until you have more than that- really closer to 100 a month is best. This is because the more conversion data you have, the smarter decisions the CPA optimizer will make for you. Without a healthy chunk of conversion data, you risk blowing your CPA out of the water while Google grasps for conversions that may not be there.
The default bidding option, and where you should start, is CPC bidding. This lets you set an amount you’d be willing to pay for each click. We have a lot of articles here on PPC Hero about bidding strategy, but a good place to start is to use the keyword tool to get an estimated CPC. If you are feeling more cautious, bid those down by 5-10%. If you’re feeling more zealous, bid up by 5-10%!
The key with CPC bidding is analyzing your data frequently to begin with. Analyze average position and pay attention to conversion volume and return on ad spend that you get for different bids.
- Delivery Method
This option is tricky. For non eCommerce clients, you want “standard” for most cases. This allows Google to show your ads evenly throughout the day based on your budget. But, ideally, for eCommerce, your campaign will be profitable and you’ll want as much money as possible. Again, that’s IF you don’t have inventory issues. As long as you have the product to sell and you’re making money—crank this bad boy to accelerated. However, that being said, come back to your setting later after you have enough data to analyze your performance by day of the week and hour to the day. You may want to set up a day parting schedule to make sure you’re not wasting money during times people are aren’t buying.
A key thing to remember for day parting for eCommerce, however, is to take into consideration click-assisted and impression-assisted conversions. People may be browsing at work and buying when they get home, for example. Testing out different schedules is a normal part of PPC management!
The ad delivery option is in this section. You can show your ads in a rotating fashion, which will allow Google to show them more evenly. This is the preferred method since it makes a/b testing for your ad copy easier and it also offers better control over your metrics. If you get really busy with other stuff at some point, the lazy but not totally awful setting to pick is optimizing for conversions. But, as long as you’re ad testing you always want “rotate indefinitely”. Rotating for clicks is default, and it’s NOT a good option for eCommerce. 
Ad Testing
Ad testing is very important, as it lets you find the best ad for your keywords. Ads are
THE product you’re showing to the world with PPC, so they’re pretty important. Here is a whole series we did about ad testing on PPC Hero. Read through that for more information on best practices, setting up ad tests, etc.
The important thing for eCommerce ad testing is product segmentation. Having your ads relevant to your keyword lists in the ad group your ad is in will get you high quality scores. Check out our guide on quality score if you have question about what that is, but basically it helps you pay less for the same ad ranks.
If you have a keyword set in your ad group about red rabbit yarn, you want to call that out in your ad. You should set up at least two ads per ad group to test against each other, but you want to call out the product in both ads. What you want to test is different benefit and features, different destination URLs, display URLs, call-to-actions, and dynamic keyword insertion. So, one ad could read:
Red Rabbit Yarn
We Have The Best Prices On The Web!
Get Your Red Rabbit Yarn Today.
And another could read:
Homespun Rabbit Yarn
Quality Red Rabbit Yarn On Sale.
Save 10% On Your First Purchase!
Following the best practices outlined the ad testing series I linked and Google requirements will get you on your way to finding your best ads!
Now you’re all set up and ready to start! There are a lot of things to think about after you’re off the ground, and a lot of cool stuff to analyze, optimize, and grow your account with. This is all of the important first steps, though! I don’t want to just leave you hanging here, though. We have so many more resources for you when you’re ready to move up in the eCommerce PPC world. Here’s some good ones:
A general search result for articles about eCommerce on PPC Hero
Articles about Product Listing Ads on PPC Hero
(^This is a HUGE area of opportunity for you to grow your eCommerce account. I’d start here after getting the basics down)


