The Simple Beauty Of A PPC Bid Template

I will not lie: I am not the biggest proponent of automated optimizations and tools. Consider me a skeptic à la Will Smith in iRobot. The more automation programs you use, the more programs that can and will break, go down in times of critical need, etc. Relying solely on automation tools for optimizations feels like putting every single very fragile egg in one basket. This is not to say that I am against streamlining processes, simplifying tasks, and making PPC life easier. Quite the contrary. Process simplification is my jam.

But when I found myself spending hours on simple keyword bid changes for one (albeit large) account each week, I knew something had to give. I started looking at all the tools available to me. Here is what I needed:
- Custom metrics: Position Share, Potential ROAS
- Plenty of if/then or if/and statements
Simple enough, right?
I started with Google AdWords automated rules. This seemed like a simple solution to a simple problem. Prior to now, I never needed to dabble in custom columns and custom metrics. This opportunity seemed like the perfect place to start. Alas! My plans were thwarted by wanting something that does not yet exist. When Google introduced custom columns in January 2016, they of course started at the top and the feature has yet to trickle down to the keyword level.
I found myself running into this problem across the other platforms I had at my disposal for this account. Back to square one.
Here is the truth: sometimes the best answer is not only the simplest but also staring you in the face like, “I’m right here, numskull!”

Enter the Excel Template. No, this is not something you have to download. This is not an Add-On. This is simply creating a template from the bid changes you do every week. Creating “automated” bid changes is as easy as downloading your keywords, dropping them in your template and loading your changes back to AdWords. Easy peasy lemon squeezy.
Let’s walk through how I built out my template.
Step 1: Download Keyword Data
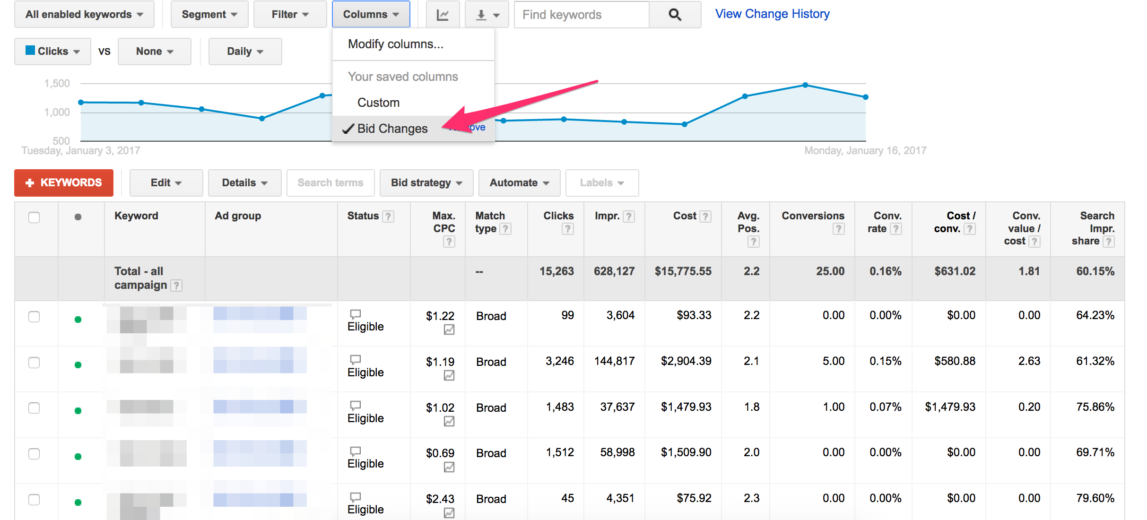
Simple enough. The best thing you can do for yourself is to make sure to move all the columns in the order you want them and save it. Saves time. While you are at it, go ahead and filter out keywords you do not want to do bid changes on, (0 impressions, 0 spend, etc.) and save that too. Once downloaded, delete the total rows at the bottom.
Starting at the end of your downloaded columns, create the headings for the custom metrics you will be calculating. I like to go ahead and build out columns for projection data as well. In this example, I have added the following column headings:
- Potential Impressions
- Lost Impressions
- Position Share
- Potential ROAS
- Bid Change
- If 0 Conversions
- New Max CPC
- New Clicks
- New Impressions
- New Cost
- New Conversions

Step 2: Define Names
One of Hanapin’s trusty Sr. Account Analyst, Rachael Law, taught me this next trick. Typically, when I do formulas in Excel, they look like the following: =C4/D4. There is nothing wrong with having all the formula cells in that format. But instead, if you define the names of your columns, the same formula for, say, click-through-rate, would look like this: =Clicks/Impressions. Not only does this make a sheet with several calculated cells “pretty”, it also makes the sheet easier to read, so the template becomes shareable to your co-workers if you are feeling so generous.
I use Microsoft Excel for Mac Version 15.3. The option to define the names can be found in the formulas tab. Highlight your entire data set, including headings and click “Create from Selection.” From there, you will want to have the names be pulled from the Top Row.
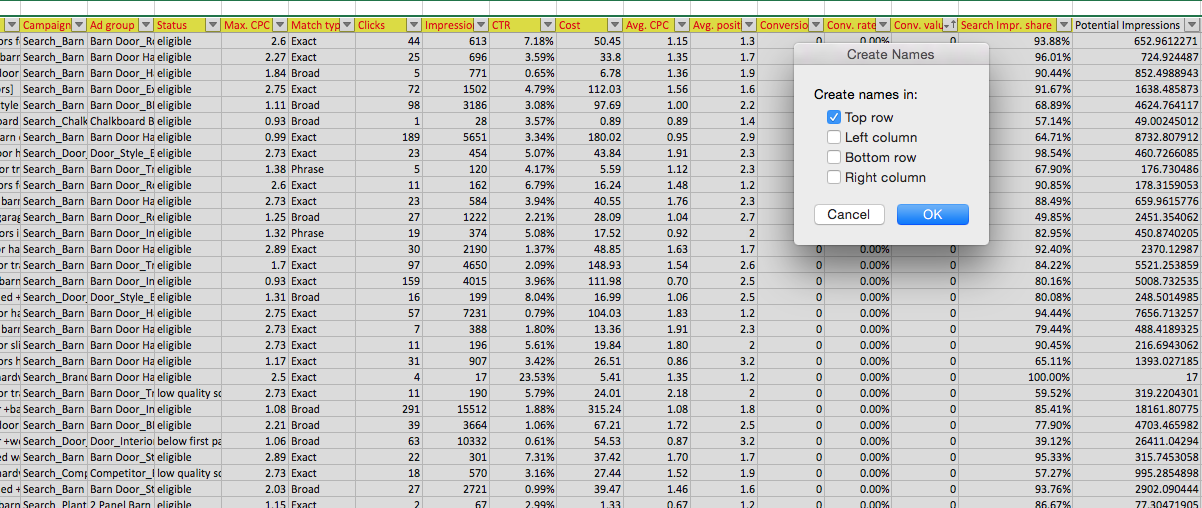
When you start building your formulas you can type the column headings instead of the cell numbers.

Step 3: Create A Bid Table
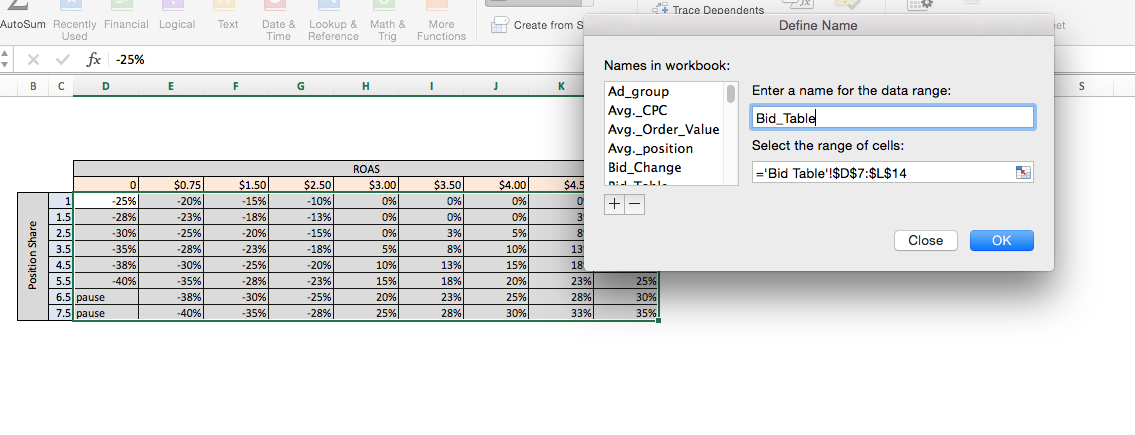
Create a new sheet in the same workbook and call this sheet “Bid Table.” In this example, I am changing bids based on ROAS (or potential ROAS) and Position Share. I have built this out using the parameters that best make sense for the account.

Step 4: Define Names
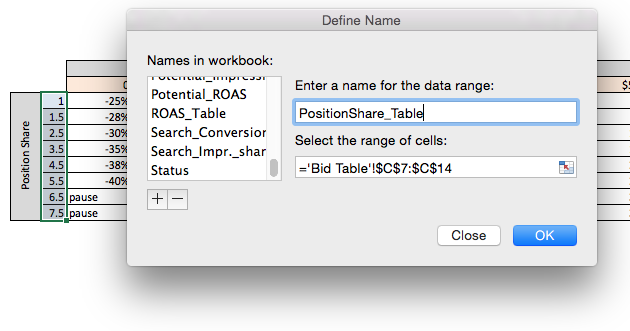
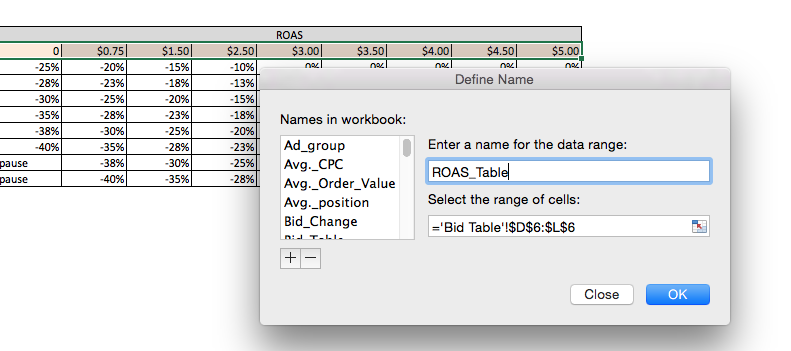
In a similar fashion to Step 2, I am going to define the segments of my table. Instead of selecting “Create from Selection,” choose “Define Name.” In this example, I have highlighted the column representing position share, naming it “PositionShare_Table,” the row representing ROAS, naming it “ROAS_Table,” and finally, the body of the table, simply naming this “Bid_Table.”
Step 5: Build Out Your Formulas For Your Template
Start creating your formulas to do your bid changes. For information on similar bid strategies, check out PPC articles from the incomparable Jacob Brown. For this example, to calculate the bid change, I use INDEX/MATCH to reference my bid table and find the correct bid change. Because I do not want to bid up too high on keywords without any conversions, I have created an IF/And statement to limit my bids.

Step 6: Track The Changes
I like to set up a little section at the top of my workbook to calculate the potential impact of the changes I will make. This is another reason I don’t like pure automation. In theory, your automated rules should improve the performance of the account if you have a solid strategy in place. I have not found automation to project changes and allow me to see the impact of the changes. Projecting the changes and summarizing those changes at the top of your workbook allows you quick access to assess potential swings in performance.
For example, say prior to changes, the account performance of the past 14 days generated 182 conversions with an ROAS of $4.23 and after the bid changes the next 14 days project at 117 conversions with an ROAS of $5.85. Knowing the account and the goals, you can determine which is more important, ROAS or conversion volume and make tiny tweaks to your formulas as needed to reach your goals.

Step 7: Load Your Bids
Once you have made the final touches (if any are needed) to your bids, load your keywords with the New Max CPCs into AdWords. Save two copies of the workbook—one as a template and one with the date of the bid changes for your account records.
Step 8: Lather, Rinse, Repeat

Each week when you do bid changes, download your keyword report and drop it into your template. You might have to do a bit of tweaking like adding or removing rows of formulas. But for the most part, a quick spot-check of the changes and you will be able to knock out even the biggest account’s bid changes in no time.
Final Thoughts
Is this the perfect end-all be-all solution? Absolutely not. But until I find an automation platform as thorough as the above, I will continue to build out custom templates for certain accounts. I am certain the future holds many marvelous tools to do so many wonderful things for us. Until the day robots take over, I am a-okay with occasionally relying on good ol’ Excel, a few custom metrics, and my own brain to optimize accounts.


