Leveraging Analytics For Remarketing: Picking The Ripest Fruit

Remarketing represents the low hanging fruit of the digital marketing world.
This cliche or some analogous iteration is parroted throughout the paid search community to no end. It’s a safe assumption that this mentality has either been repeated or embraced by nearly every account manager, myself included. And while the frequency becomes repetitive, its prevalence is well founded based on competitive returns in volume and efficiency. With that said, low hanging fruit isn’t always easy to pick.
The struggles of effective remarketing become further amplified when focusing on a product or service that offers a complicated purchase path. When this is the case, simply bidding up through search or sending out generic banners based on an arbitrary conversion window will yield underwhelming results.
This scenario, much like selecting an avocado from your local Piggly Wiggly, requires more nuance and experience to bring home the right results. In an effort to avoid another terrible analogy, let’s take a quick glance at the roadmap to remarketing a product with an extended purchase path.
- Step 1: Identify the average interactions
- Step 2: Analyze purchase lag
- Step 3: Run a cohort analysis
- Step 4: Create remarketing lists and apply proper negatives
- Step 5: Profit…

Step 1: Identify The Average Interactions Required
Many products, particularly within ecommerce, don’t require a complicated strategy to re-engage customers. The same cannot be said about the product we’ll examine for the remainder of this blog. For reference, the item is created through a multi-layered customization process. While the design is intuitive and user-friendly, our audience needs time to digest the options at hand. Given this obstacle, remarketing shifts from beneficial to a borderline necessity.
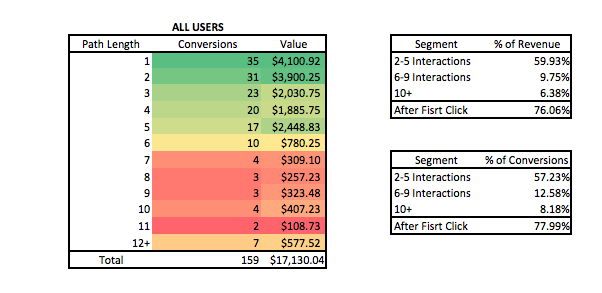
In order to identify similar products, a good first step is to navigate to your Google Analytics profile and open up the Path Length Report under Multi-Channel Funnels. Within this report, different conversion segments can be created based on a multitude of interactions. Filter your data with variables such as URL, source/medium, search query, and more. Once this is properly configured it is important to select the proper conversion for analysis. After segmenting, exporting, and formatting for the visual effect, we see this product presents a fairly drawn out conversion path.

The data above reveals that 76.06% of our product revenue comes beyond the first click. Just short of 60% requires 2-5 interactions, while roughly 16% requires greater than 6 touch points. That is a significant amount of traffic reaching beyond the first click. Given this extended path, there is ample opportunity for users to exit the purchase path. For bonus points reference The Top Conversions Path report in order to get a greater sense of which mediums are bringing users back to your site.
Step 2: Analyze Purchase Lag
Once you’ve sufficiently established that your product or service offers an extended purchase path, diagnosing proper time intervals to remarket becomes vital. An excellent place to launch this investigation is under the time Lag Report in Google Analytic’s Multi-Channel Funnel Reports.
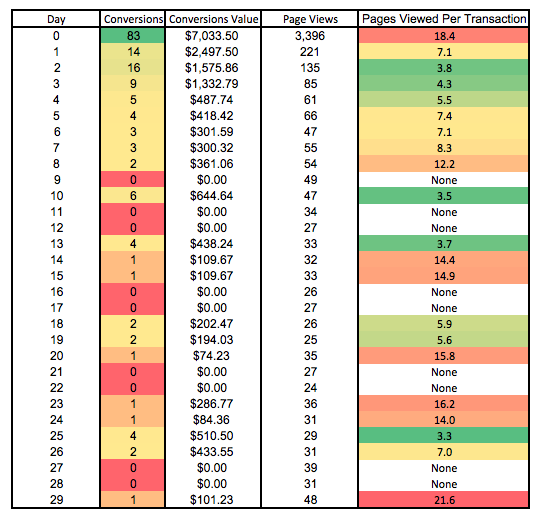
Similar to the path length analysis, you’ll have the option to create a unique conversion segment in order to properly limit your data. Additionally, conversion goals can be manipulated to achieve data that properly reflects your desired action. As a simple example, the case below shows conversions over a 30-day span, corresponding revenue, and pages viewed per transaction. While admittedly there are plenty more variables that go into this metric for an ecommerce client, it nonetheless helps fill out the story.
As shown below, the first day our audience visits the site remains the highest driver of traffic. Despite this, there is healthy transaction activity reaching out through the entire 30-day span. Of particular note is the large volume coming between days 1 and 10. The varied levels of intent indicate a qualified audience familiar with the website and ready to complete the purchase. Using this information we’ve demonstrated the value in returning customers while simultaneously identifying time intervals to target.

Step 3: Couple Your Data With A Cohort Analysis
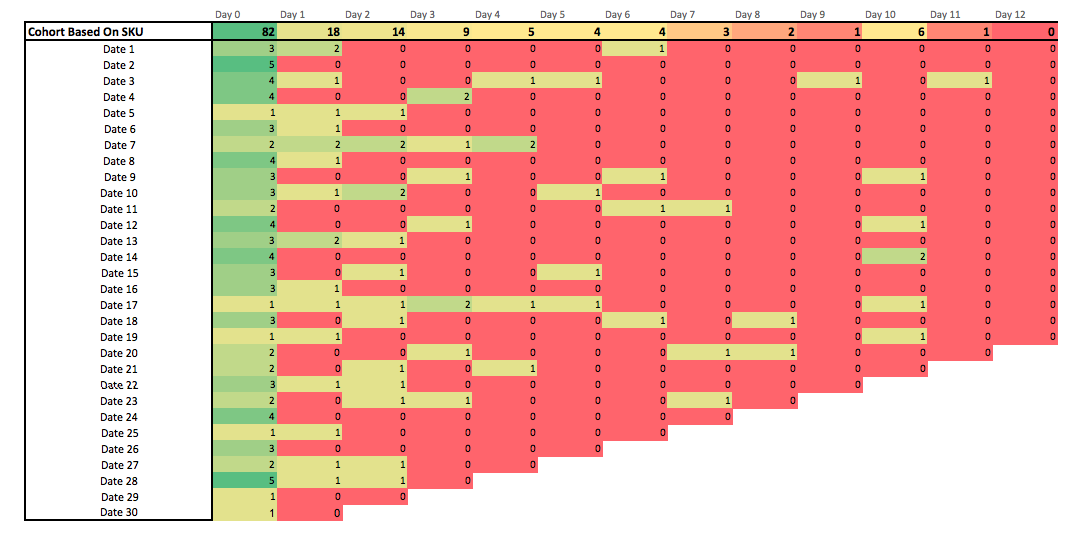
While the graph above does an excellent job demonstrating the delay between first interaction and final transaction, the Cohort Analysis within Analytics is a useful tool for viewing data on a 30-day individual snapshot. The report can be found under the Audience tab in Analytics. If limiting your data to a unique service or product you’ll need to create a new Segment View.
To create a new segment simply click +Add Segment followed by the red +New Segment button. Sessions can be limited by almost any identifier imaginable including behavior, demographics, and traffic sources. In my case, I navigated to Conditions and filtered by the associated Product SKU. Further filtering can be achieved in the Enhanced ecommerce section if seeking to limit by brand or product category. After creating the segment, I exported the data based on conversion completions and once again applied conditional formatting. Other metrics worth noting are user retention, session duration, and page views per user.

The key to a successful remarketing strategy is letting the data tell the story. From there we can supplement the data with realistic explanations based in common sense. This prevents digital marketers from having to make sense of seemingly random and chaotic user behavior. These reports, in particular, provide a truly defensible foundation for creating differing intervals and bidding heavy in the first week.
Step 4: Create Your Lists And Implement
Now that we’ve done the dirty work and identified opportunity, it’s time to implement the actionable insights. I find Google Analytics Remarketing Lists to be the most successful way of managing audiences. Customize each list based on parameters unique to both your account and analysis. Identify those crucial timeframes in which customer value seems to alter and adjust bids accordingly. In the case of my product analysis, users reached differing points in the customization process that affected customer value, but more so dictated their inherent preferences. Factoring this information in allows landing pages and ad messaging to be configured properly.
Once these lists are created head on over to AdWords and begin the implementation process. Create separate ad groups for each unique list. Don’t forget to use negative lists within your time intervals either via negative audiences or custom combinations. If opting for Display, pay special attention to your creative and landing pages based on each ad group’s targeting specifics. If opting for RLSA, don’t forget your routine best practices such as specifically tailored sitelinks, call outs and structured snippets.
Step 5: Sit Back And Make It Rain
Hopefully, all your hard work has paid off. Now that you’re so swamped with remarketing transactions make sure to snag the tool below to make it rain efficiently.

Closing Thoughts
Ultimately, remarketing is something that nearly every account can benefit from. When the conversion path spans multiple weeks, picking an arbitrary remarketing window with all purpose creative will leave plenty of opportunity on the table. Through Google Analytics, however, we can re-engage a valuable audience based on a timeline backed by data.
Title Image Taken By Anne Arnould


